Learn how to add a recessed shelf that fits inside the wall between studs. It’s a great storage solution for small spaces!
I love the idea of making storage out of unused space, and one way to do this is to build a storage shelf between the studs in your wall.
Basically, you cut away the drywall and nestle shelves into the space between the wall studs to create a storage area that is flush with the wall.
I knew our pantry project was the perfect place for a shelf like this. We have built-in shelving on two walls, but there wasn’t enough space for shelving along the third wall. We need to be able to walk into our walk-in pantry, after all.
So my husband built a between-the-studs shelf!
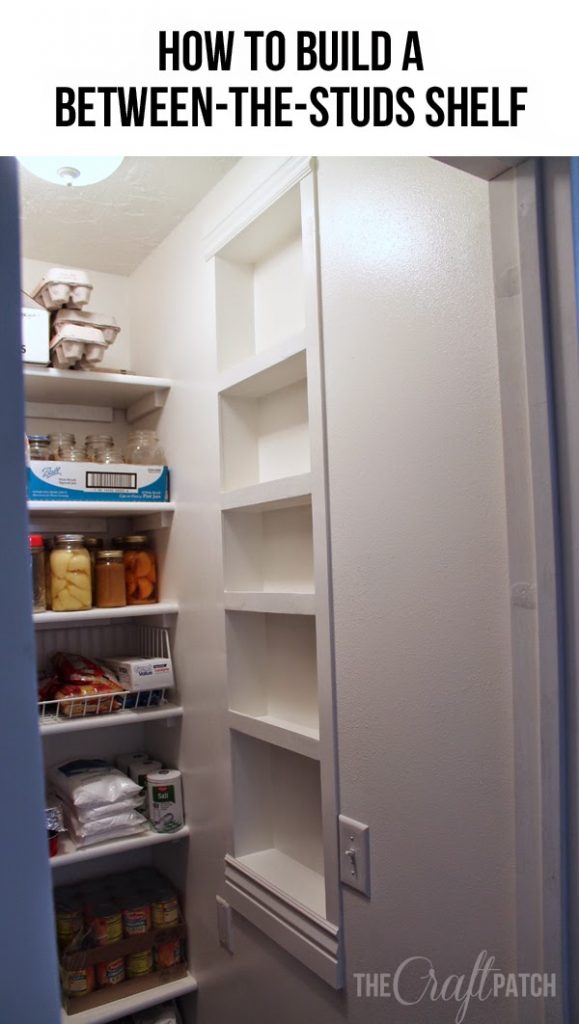
You can see in the picture below exactly where the shelf is located:
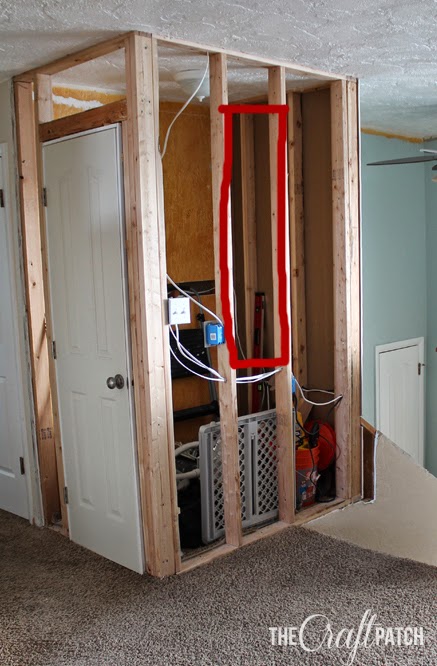
If I were to do it over again, I’d move the light switch. Oh well.
Before he put the drywall up, my husband nailed horizontal 2×4’s where the top and bottom of the shelf would be. Then he hung drywall, completely covering the inside and outside.
After the drywall was taped, textured and painted, we carefully cut a rectangle shape into the drywall. The cuts were made along the inner edge of the studs all the way around. You can find studs in your wall by using a stud finder and double, no triple checking your measurements. You also have to be careful to cut little by little… you don’t want to go sawing through wires! We knew exactly what was in our wall because we built it, but in most situations, you don’t. Proceed with caution!
When we were done, we were left with a hole:
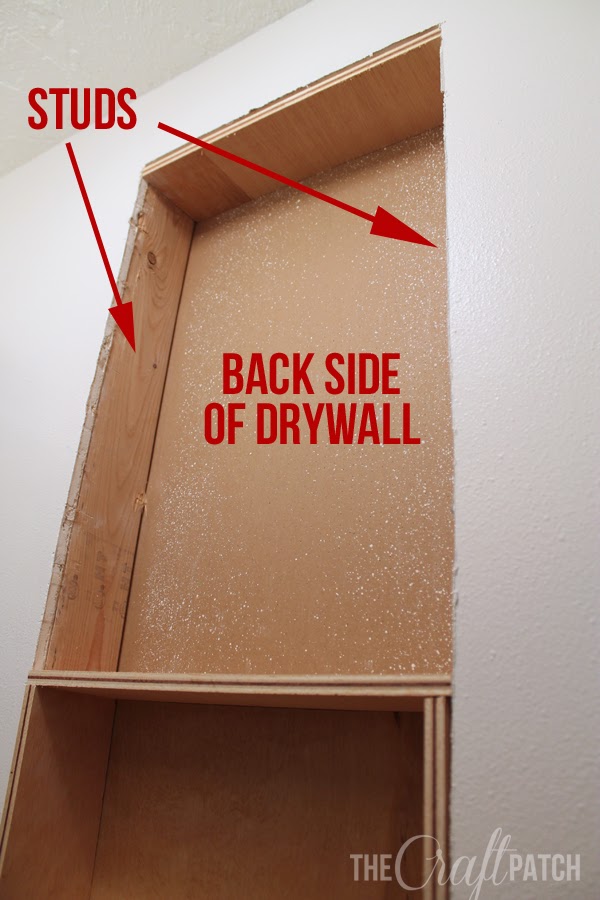
Next came the shelf-building part. Each part of the shelf was cut separately and nailed in place as we went. So for that bottom section, there were two horizontal pieces, two vertical pieces and a back piece. We built it this way so that we’d have something to nail to. The back of this area is the drywall in our living room, so we couldn’t nail anything into the back–only the side studs.
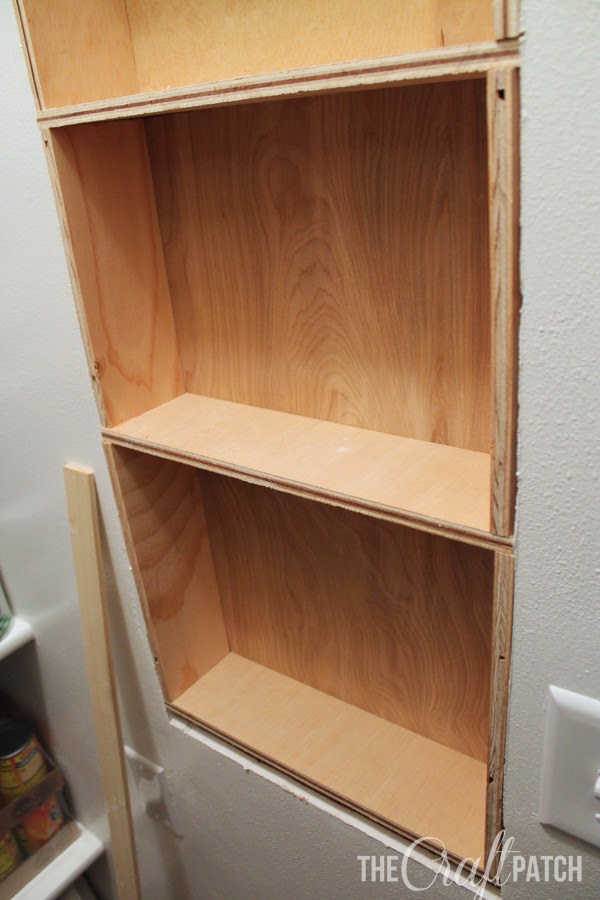
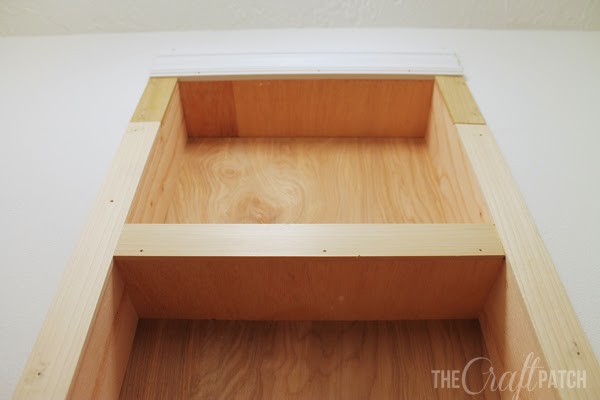
After building the shelves and nailing them all together, we added trim… moulding along the top and bottom with thin slats of wood along each side. We used the same slats (I think they were made for lattice) to add a lip to each shelf.
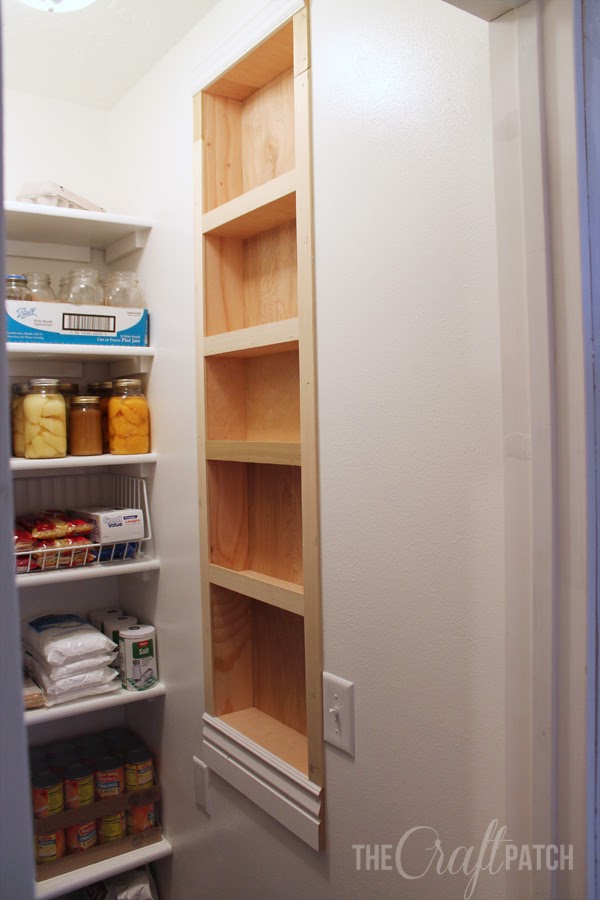
Here’s a close up:
After a lot of wood filler to cover up all the imperfections and several coats of white paint, we have a between-the-studs shelf!
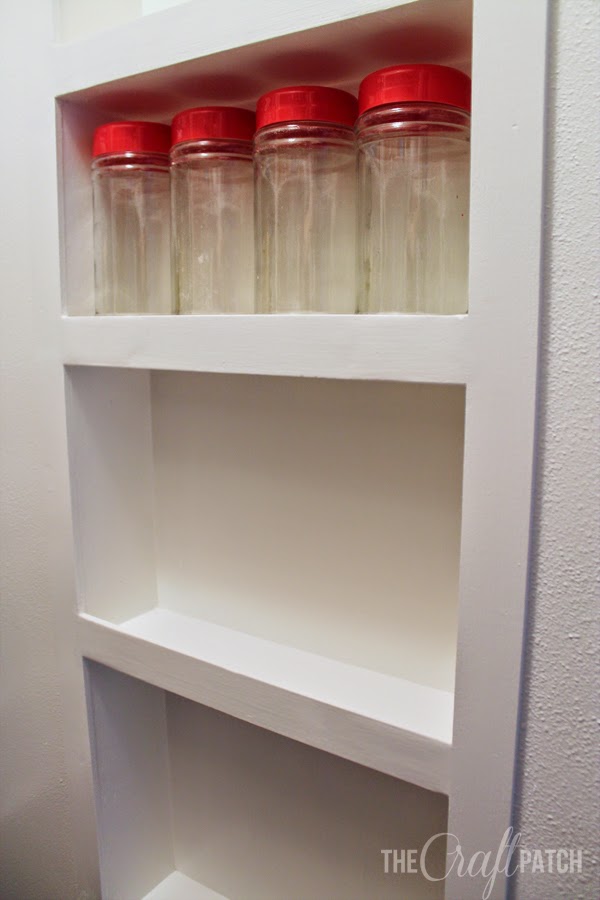
I love how it turned out! It’s the perfect place in my pantry to store little things… spices, sauces, etc. and of course, our candy jars which are empty at the moment. Boo!
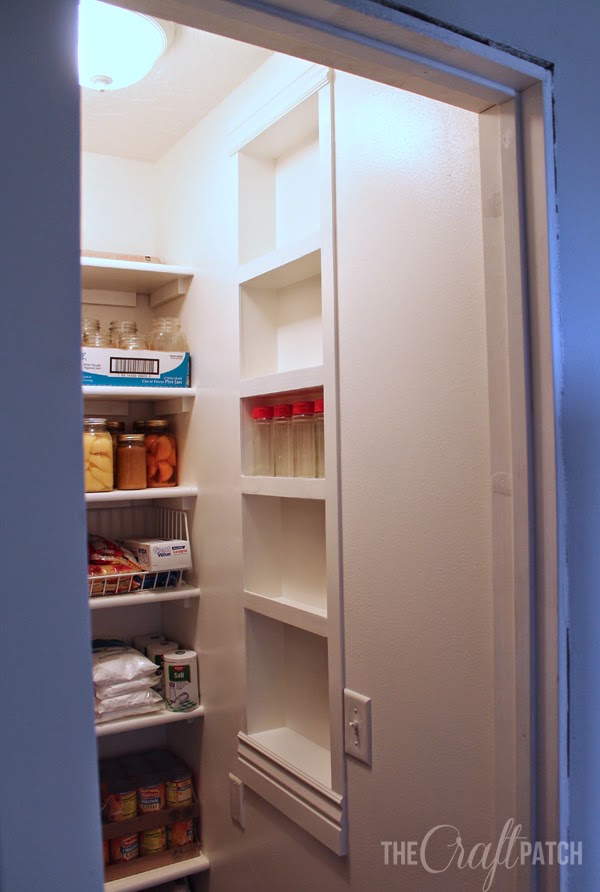
Do you have a place in your house that’s just calling for a between-the-studs shelf? They’d be great in any room… craft room, bedroom, bathroom, entryway. Really. Such a great way to add storage without taking up any floor space!

Comments & Reviews
This is brilliant! My husband and I are going to be replacing the old horrible giant in the wall electric heaters with a new heat pump system next week. The old units are between the studs, and we've been trying to come up with a creative solution for our massive pile of books. We are so going to do this.
Perfect! The shelves are only about 4 inches deep, so you may want to build them out just a bit if you are going to use them for books. But that's totally doable!
Great article. I have to make my shelves protrude about & inch father out from the wall to come out to as far as the 10 inch high concrete floor base that runs all along the bottoms of my gargae walls where it meets the floor. Still
Trying to look up how I should do that.
Good to know, thanks for the tip!
Such a smart idea!! I love how it turned out! Can't wait to see you at SNAP!
OMGeeee! What a fab idea, job and transformation. All the way from Auckland, New Zealand. Thank you for the idea and how to. Love, love, love it.
Yay, so glad you like it Theresa! 🙂
my dogs made some ugly holes in the laundry room wall. im still not sure how?! but since the holes are already there this is a great idea to fill them and have more storage in the laundry room.
Sounds like you are making lemonade from lemons! Great idea!
Well done!!! Clap clap clap!!!
This is a fantastic tutorial. Thank you so much.
I may have missed it but did you just use plywood for the shelves?
We had some scraps of solid pine that were just the right size, so we used those.
How did you attach the back panel if you could not screw it into the drywall behind? This is an awesome idea, I can't wait to try it!
If I remember right we used glue on the back of the panel and the side pieces help hold it in place.
Your work looks great! I only learned to use a drill and saw this year so am a very green newby to DIY. Even so, I and my spouse have almost finished the basement. I put shelves between the studs that were 6 inches. I used the stud sides and had to measure and cut each shelf because the studs weren't square. I then painted them the color of the plaster. The cubbies look okay but could be better. Next project will be the studwalls on the first floor stairs. I plan to make sides and shelves first to fit in the stud bay and shim for square/plumb. I think it will be much easier and look better. I will extend them for a better sized book case. Oh well, I learned to measure and cut lots of angles!
Great job Brenda! The best way to learn is to just go for it.
Great tutorial on stud wall shelves – one of the very best and clearest I’ve seen anywhere! The suggestion made in one comment of building the shelves as a unit, then installing is a neat variation. These shelves would also work great in a bathroom behind the door and could be made deeper wherever they are used. I like the addition of the lattice trim on the fronts of the shelves to make them more substantial looking. These little beauties can be used everywhere. If you are building or remodeling, these could be planned for many areas. Years ago my husband did a variation on this – we removed a spindled partial opening between our dining and living room and closed the dining room side. We used the back of the sheetrock painted a blue accent color as a bookshelf area (this faced the living room) with stained shelves just deep enough to hold a collection of Reader’ Digest Condensed Books (kept for their lovely bindings) and some small accessories. This gave us a nice accent wall in the living room and a wall large enough for our hutch (also built by my husband) in the dining room. Thanks again for sharing this tutorial as well as the one on pantry shelves.
You’re so welcome, Jill! I have a collection of Readers Digest books too… you’re right, the spines are so pretty!
So, my X made a lovely, between the shelves in the foyer of our home. Now, I’ve got my boyfriend convinced that we’re doing this. I want to put a full size, behind the door unit in the bathroom. I see people saying extend the shelves to up to 6” to accommodate something like books. HOW? How do you make shelves deeper than the wall work as far as looks good goes.
I think you’d have to frame out the sides that stick out and the front with decorative trim to make it look intentional some how.
Did you paint the drywall directly? Id think id be scared of putting a hole. You didnt put up any backboards?
No, we lined the walls of the shelf with hardboard.
My pantry space is 30” deep x 38” wide x 96” high. Do you think what you did in your space would work in mine? I’m trying to find a site to put in the measurements and see some choices, but I’m not finding anything yet! Thanks
Hi, How much space/many inches did you have each shelf spaced out at?
They’re about 8 inches.
What type of wood did you user for the boxes?
Super thin plywood
Awesome. This is an old but great post. I’m trying something similar myself to close in 1 of two doors to our old farm house. Hardest part is finding the back board considering the shelves are so small.
Excellent post!! My husband is cutting our pantry drywall as we speak 😀 This will be the perfect solution for one side of our pantry. So happy to have found your blog. Thanks so much!!
We are in the middle of building are new pantry on are new addition. That’s next to are new dining room And my husband put the light on the outside of the pantry 🤣 I read how you said that was the only thing you would change. I’m putting a little counter top on this side.
Absolutely great idea. it would be great to have shelves on all sides but the ifea of still making the natrow space work by using the studs is brilliant. it looks great. I always wanted to try it at home but it is a hard home with plasterwalls. So anything I do has to be with purpose and deliberate with a lot of work to cut through plaster and it’s metal mesh, ugh. Brilliant results btw.
Hi there! Melodie in OK here! This is absolutely genius!! Thank you so much for sharing this gem!! I will be attempting to do this in my bedroom and kitchen. Any chance you might have a printable on this with all the necessary info? Also, I know you mentioned about moving your light switch….so what other tips would you pass on to me? I am so thrilled I found you! You are wonderful and I look forward to getting crafty and learning from you. Hats Off to you 🙂
Hi.
I’m so grateful for your post! I’ve been talking to a hsndyman for a year. and they did not think it was a good idea.
And you just showed me how to do it even by myself here’s my plan…
I have a long hallway with with a closed railing and drywall framed base…
thanks for showing me how I can take this dead space and fill it with strong shelves. Framing with molding adds a nice Elegant Touch.
If this works I have really wanted to take our tiny bathroom that has a bedroom on the other side and turn that wall into shelves so there’s no furniture or cabinets needed in the bathroom.your idea of thin plywood will add a little added sound proof barrier too. :0)
Thank you so much for your idea. Now I only have to figure out how to create thin doors for the bathroom in wall shelves…. but one challenge at a time. :0) can’t wait to get the framed railing started.
Happy holidays