Foam crown molding is simple to install and looks just like wood molding! Learn everything you need to know about installing foam crown molding from someone who tried it.

Thank you to Crown Molding Solutions for providing product for this post.
One of the challenges of remodeling is the unexpected complications that come up along the way. Today I’m sharing an awesome product that solved a big problem for us in our remodel. It’s crown molding made out of foam!
The problem:
When we first moved in, the whole upstairs was trimmed with a series of different sized wood pieces all nailed together to give the quasi-look of molding. It really wasn’t my style. It was poorly installed and even more poorly painted. It looked awful. It was one of the first things we ripped out of our home when we moved in.
The problem is that removing the old “molding” (and I use that term very loosely) damaged the ceiling and walls pretty badly. It was going to be way, way, way too hard to patch, so we knew we had to add new crown molding to cover up the damage.
But the problem didn’t end there. Problem #2: we have ceiling heat upstairs, which means you absolutely cannot nail into the ceiling for fear of severing one of the heating coils and permanently disabling the heat system.
So we HAD to have crown molding, but couldn’t nail crown molding up.
Grrrrrreat!
That’s when I started researching and came across Crown Molding Solutions. Their foam crown molding was similar in price to the wood we would have bought, but is lightweight and made of foam, so you just glue it to the wall! It was the perfect solution for us!
So we picked out a size and design we liked and in no time flat, our molding showed up on our doorstep.
This is what it looks like:

It’s the 4.5 inch molding in style #4. See all of the styles HERE.
This is after we had painted it. I painted all of the molding before installing and that was definitely the right choice… much easier than standing on a ladder and having to tape off all of the edges.
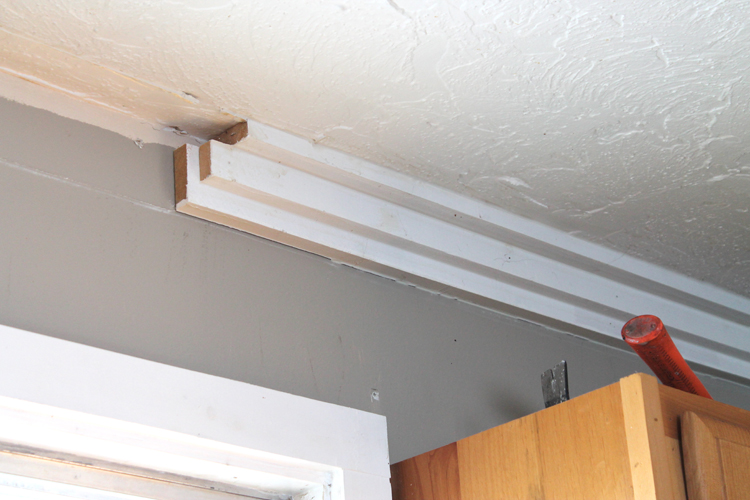
The molding has a flat back and top so that you have a surface for gluing.
To install, we applied LocTite Power Grab All Purpose adhesive to the flat back and top parts and pressed the molding into place. Easy peasy!

There’s even a YouTube video that shows the installation process. Watch the tutorial HERE.
We still had to make mitered cuts for corners, but this stuff cuts so easily that we did a lot of it with a hand saw.
Also, I just wanted to show the power of caulk. After installing the molding, the next step is to caulk the edges.

You can see in this photo how much of a difference it makes:

Before caulk there are a lot of gaps, but after caulk, everything is smooth and filled in. Caulk makes such a huge difference!
Here I am, balancing precariously on the arm of the couch and caulking up a storm:

I am so happy with how the molding turned out. It adds such a nice finishing touch to the space. Here’s the room before molding:

And here it is after:


The room looks so much more pulled together and finished. I love the added character.

We decided to build our kitchen cabinets up to the ceiling to close off that awkward area that just collects dust, so my husband built boxes to fill in the space, then we trimmed the cabinets with molding. Here’s the “before” picture…
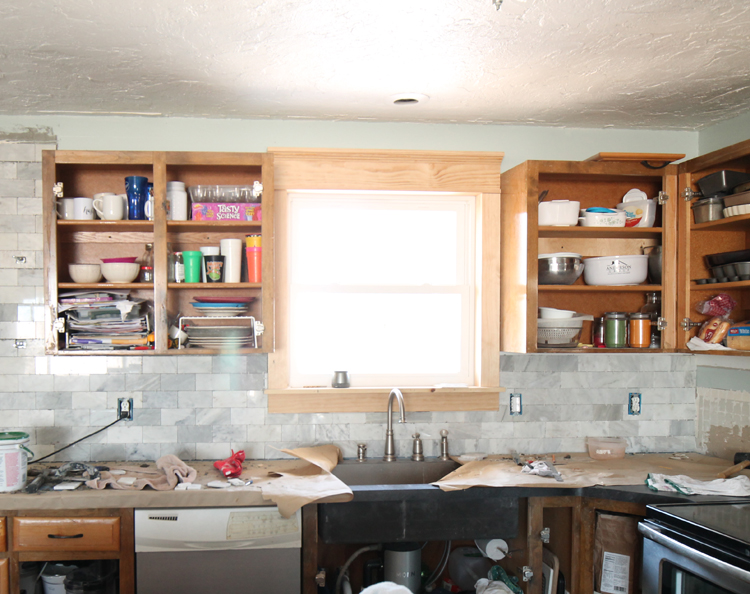
… and here’s the kitchen after building the cabinets up and adding molding:

Doesn’t it look great?! The molding adds so much drama and makes the whole kitchen look custom. Obviously we’re not done working in the kitchen… we still have cabinet doors to build and need to paint the cabinetry, but it’s a great start and I’m so pleased with how things are coming along.
Here are a few things you might want to know if you’re thinking about installing foam crown molding in your home:
- Foam molding is a great option for people who are uncomfortable with using power tools. You could install molding in an entire house with only a hand saw.
- The molding comes unpainted. Start with one coat of primer, then two coats of semi-gloss latex paint. I used an angled brush, but if you have a paint sprayer, it would work well for this job.
- Because it’s foam, the molding is very lightweight, so installation is easier. Even my kids could lift an entire 8 foot section of molding above their heads.
- Once it’s installed, foam crown molding looks just like traditional wood molding. I seriously can’t tell a difference.
- You do have to be careful not to dent the foam during cutting and installing. It’s soft, so if you push too hard on it or press tools into it, it will leave indentations. It’s not a big deal… just something to be aware of.
- If the thought of cutting angles scares you, you can purchase pre-made inside and outside corners! No mitered cuts needed… just install the corners, then caulk all of the seams. Talk about simple! The pre-made corners are available HERE.

Comments & Reviews
It looks beautiful,what kind of paint did you use to paint the crown molding?
regular latex interior paint
How did you get the caulk to look good without taping? I’m having a heck of time finding a good tutorial that doesn’t involve the extra work of taping first.
I taped. It’s the only way to get a crisp line on colored walls.
Just use a wet rag if you are not good at caulking. Use siliconized acrylic latex caulk.
Finally, I dont have so much tools, and have a double wide house. Can we put crown molding in the bathroom and kitchen cabinet? Scare the glue off from moisture, steam and heat. Thx you for advise.
Yes! Foam crown molding works really well in bathrooms and kitchens!
What color paint do you have on your walls? I love how fresh it looks!
It is Sherwin-Williams Rainwashed and it is such a gorgeous color! We painted about three years ago and I have loved it every day since!
You did a fantastic job it looks great. First time I Have heard of foam molding. Did you have to order specially from the manufacturer? I guess places like Home Depot or Lowe’s don’t carry such animal. I am impress even thou you standing on the couch arm, I am kidding. Good job.
They don’t sell it at home improvement stores, so yes, you’ll need to order it from the manufacturer.
Your rooms look fantastic! Did you purchase the inside and outside corner pieces or did you cut the foam for those locations? Trying to decide which would be easier.
We didn’t purchase the inside and outside corner pieces because my husband is pretty good at figuring out angles. It would definitely be easier to buy the corner pieces though!
I love it from top to bottom. Thank you for helping people like me who want the look but have no idea where to start. It looks so comfortable and inviting. And should you choose to sell someday it’s a nice touch.
Thanks so much Amy!
It looks fabulous, especially above the kitchen cabinets. Does this company make a similar product for chair rail?
Thanks
I wouldn’t recommend using foam molding down low at chair rail height. It would dent too easily! It works perfectly up high where it never gets touched, but baseboards and chair rails would not work well I’m afraid.
That’s a great idea foam crown molding. I am doing some remodeling and was thinking of doing molding. I will definitely try the foam. Thanks for sharing! And also love the paint color.
This is awesome and looks so refined. I am definitely going to do this. I had never heard of foam crown molding until this and what a game changer!
Do you have to caulk the edge that makes contact on the wall??
Yes, you need to caulk both edges. It seems like a pain, but it looks so much better that way. And it looks best if you do this method: https://www.thecraftpatchblog.com/the-trick-to-perfect-crisp-caulk-lines/
WOW who knew! I will keep this in mind. It looks great and seems easy.
I just found your post and wanted to say thanks for the before and after pictures. I was searching for an easy way to do crown molding and found this. I am all for giving this a try. I love being able to do home improvements myself rather than hiring a handyman all the time. Thanks again.
Can this work on crown moulding on kitchen cabinets?
Yes it can! In fact, we used it in our kitchen. Our cabinets go all the way to the ceiling, so we just continued the crown molding from the rest of the room above the cabinets. Here’s the post about our kitchen: https://www.thecraftpatchblog.com/whitekitchenmakeover/
I am trying to hide cable wires behind crown molding. Is there room behind this product to hide wires and connection splitters? The ease of this product looks amazing
Look at the picture I show of a side view of the molding. It’s basically a 90 degree angle on the back, so there’s not really room for wires.
HOME DEPOT DOES CARRY THE FOAM CROWN MOLDING—JUST NOT IN THE STORE BUT EASY TO ORDER FROM THEIR WEBSITE—I ORDERED 1 PIECE AS A SAMPLE TO BE SURE OF THE FIT—FREE SHIPPING WHEN YOU ORDER THE LARGER QUANTITIES—MY 1ST ROOM IS 14X20 AND IT SHOULD TAKE 12 PIECES AT 6 1/2 FT LENGTHS AND ONLY A MATERIAL COST OF ABOUT $70 WITH TAX
Can the foam crown molding be stained?
Nope… only painted.
Are the seams visible? Did you caulk the seams after install to hide them better?
You do have to caulk the seams and if you do a good job lining things up, they’re pretty much invisible after that.
Can you stain this styrofoam? I woudl like it to match what I have which is a fruitwood colored. Thanks.
No, the styrofoam must be painted.
How tall are you ceilings? 8 foot or 9 foot? Why did you go with 4.5 inch crown instead of something larger or smaller. Thank you
We have 8 foot ceilings. We chose the molding thickness because we needed them to cover the damage caused from pulling off the old molding.
What is the website you ordered these from?
https://foamcrownmolding.com/
Looks great! Do you think you would be able to put painter’s tape on this product if you wanted to repaint the walls a different color in the future?
Yes, you can put painter’s tape on the molding.
Wow,It looks very nice
Hey I know this post is older… I just wanted to know how they were holding up and how easy they are to clean?
They’re great! They still look amazing. The only issue we’ve run in to is that they dent if you accidentally whack something into them. Since they’re up so high it hasn’t been a problem.
Did you build the boxes out of mdf all the way to the ceiling, then or just to end of foam?
All the way to the ceiling. There needs to be something behind the foam so you have something to attach it to.
This is a great article. My husband is a contractor and the foam is the only crown he uses in our house and where he works. We love it! Thanks for writing about it so well.
Hi, love the moulding! We used this for the first time and as a first go I’m really pleased with it. Can I ask how you get around joining two ends together? Being foam we were very cautious when it came to sanding but in a couple of places we have a ridge where they meet. Any advice would be very much appreciated. Thank you.
We ran in to the same problem. With traditional molding, you cut the boards at an angle so they slide together for a better seam. I just tried to sand and caulk out the worst of the ridge, but you can definitely see some joint lines in our home. I’m hoping to add more of this molding to our bedroom in 2023, so maybe I’ll come up with a better method then.
Is foam molding typically less costly than traditional wood molding?
Love it! Do you have different styles of crown molding?
Yes, the company that makes this crown molding has different styles.
Can this be stained or just painted? Thanks
It cannot be stained because it’s not made of wood. Paint only!
Crown molding comes in foam? Who knew until your post! Good job!
Where can I get this and are there other moldings like staked baseboard preassembled picture frame?
I would only use foam molding as crown molding. It does dent, so if it was down low where you run into it and get daily wear, I don’t think it would hold up.
What about putting in a kitchen with an uneven ceiling (at one end I have a 2 inch gap, going along ceiling it changes to 3-4 inch gap)? I had new cupboards installed and removed the old that were built onto the wall and went all the way up to ceiling, couldn’t tell it was uneven until new cupboards up.
I don’t think this product would be the right thing to use in your case. You will probably need wood molding so that you can cut it down to fit the slant of your gaps. Good luck to you!
Nice tutorial you’ve given us DIY’ers Thank you! Nicely done Can’t wait to use your tips on my son’s place.
O my gosh it makes your room look soo cozy a inviting. Thanks for sharing
This looks so good that I will have to try it. Thanks for the info.
Can it be stained?