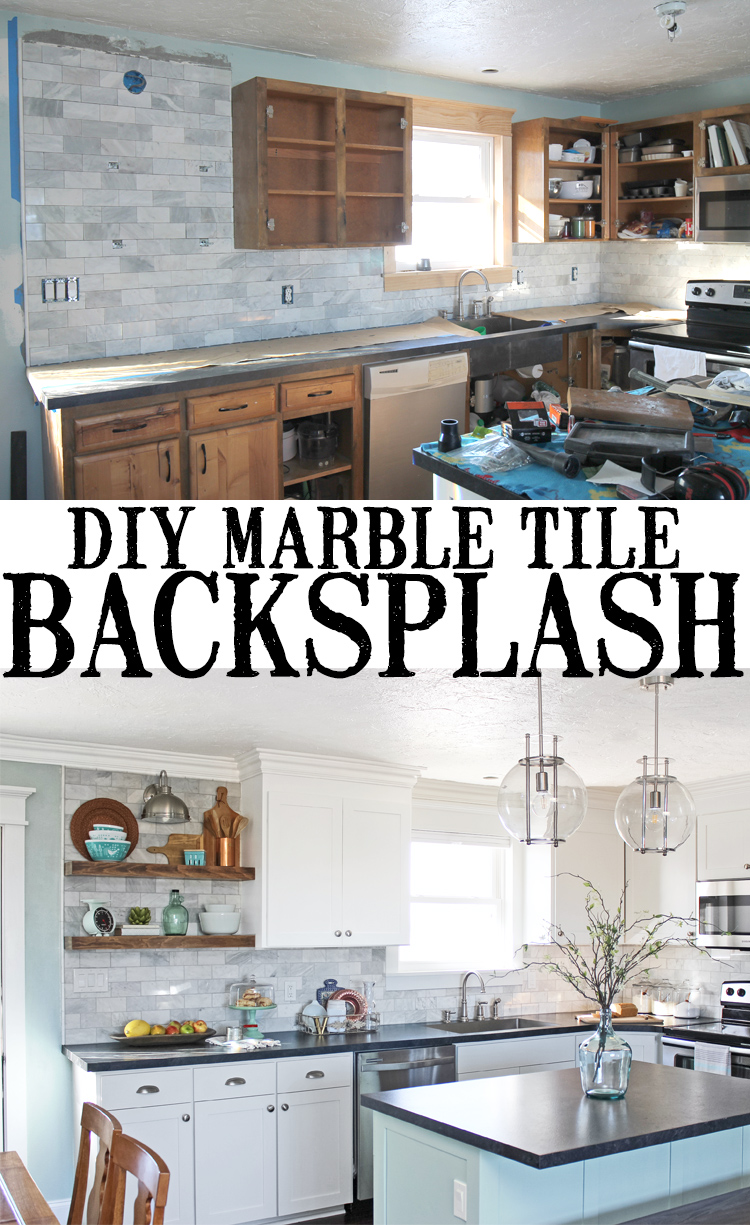
Tips and tricks for installing a marble tile backsplash. Yes, you can do it yourself!
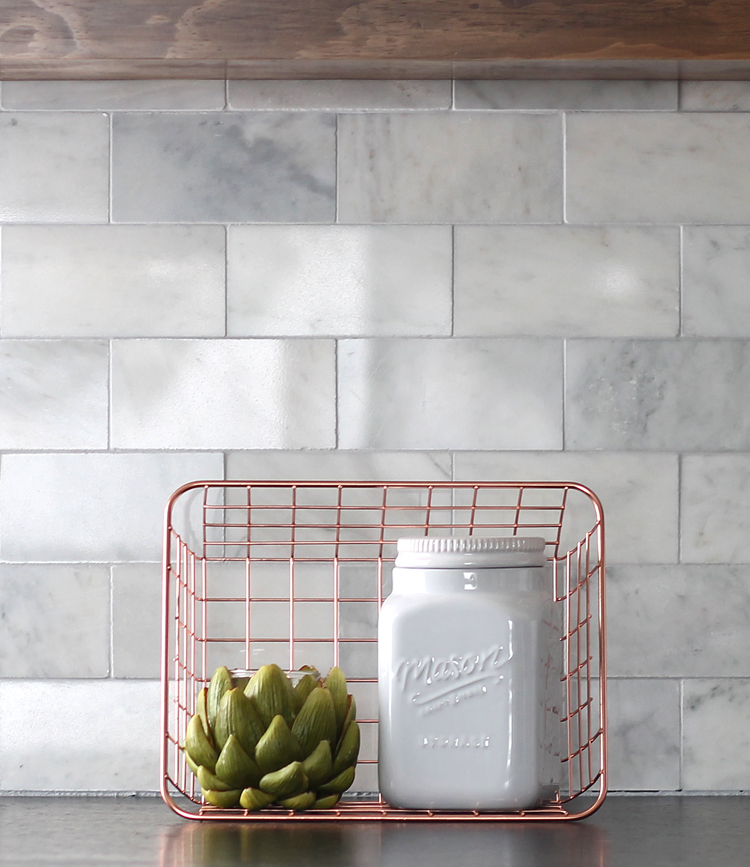
A few weekends ago, we installed our kitchen backsplash ourselves. Neither of us have done any tiling work before, so we were a little nervous about it. After completing our first tiling job, I’ve got a lot of tips, tricks and answered questions to share with you. I think you’ll find this useful if you’re considering DIY-ing your own backsplash. It’s kind of a long post, but that’s because it’s packed with helpful information!
Prep Work
The first step is prepping your walls. This is probably the single most important thing you can do to ensure that your tile goes on smoothly with no funky corners sticking up. This step took us a long, long time because when we removed our old backsplash, the walls got torn up. We had to replace drywall and do a lot of patching and sanding.
We also installed metal floating shelf brackets before tiling. We wanted them to be screwed into the studs, so it made sense to do this before tile got in the way.
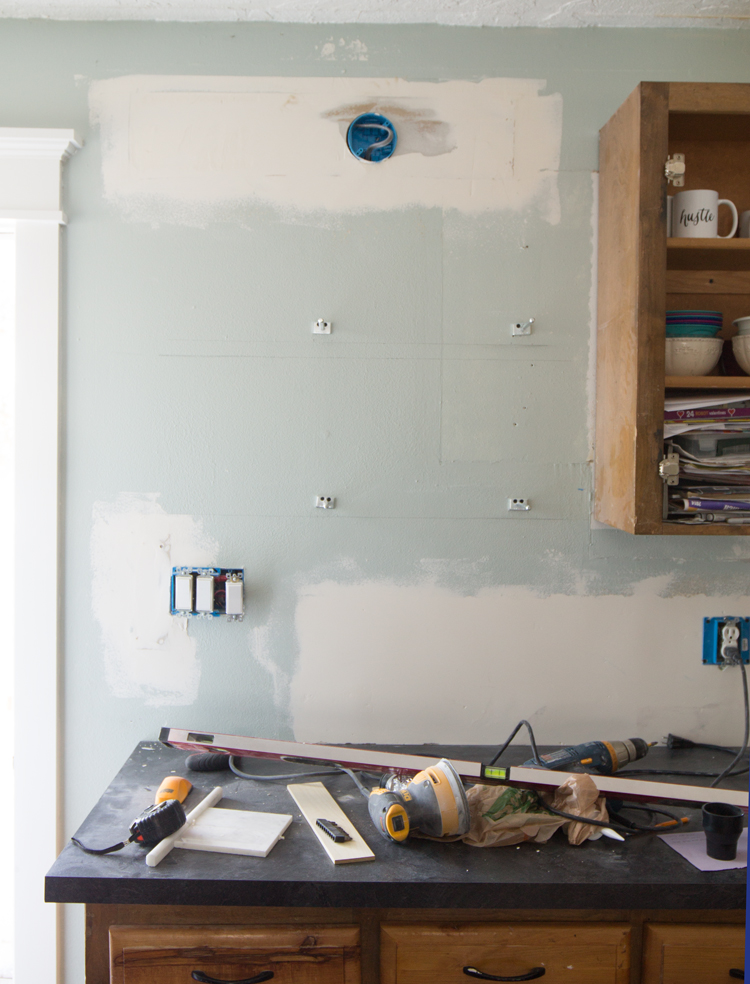
You will also need to install outlet extenders on all switches and plugs that will be within the backsplash area. Since the tile is thick, you don’t want your outlets to look sunken into the wall. The outlet extenders bring switches and plugs out to the correct depth so they’ll look right once the tile is surrounding them.
This is one of those places where we made a mistake learned something. See how the outlet extender has a face plate around it?

Yeah, don’t think you can just tile over that bump without it showing. We ended up cutting off all the the parts of the plate that were flat with the wall. We tried tiling over one and it made the tile look horrible and uneven. So either buy a different style of outlet extender, or do the same as us and cut pieces off to make it work.
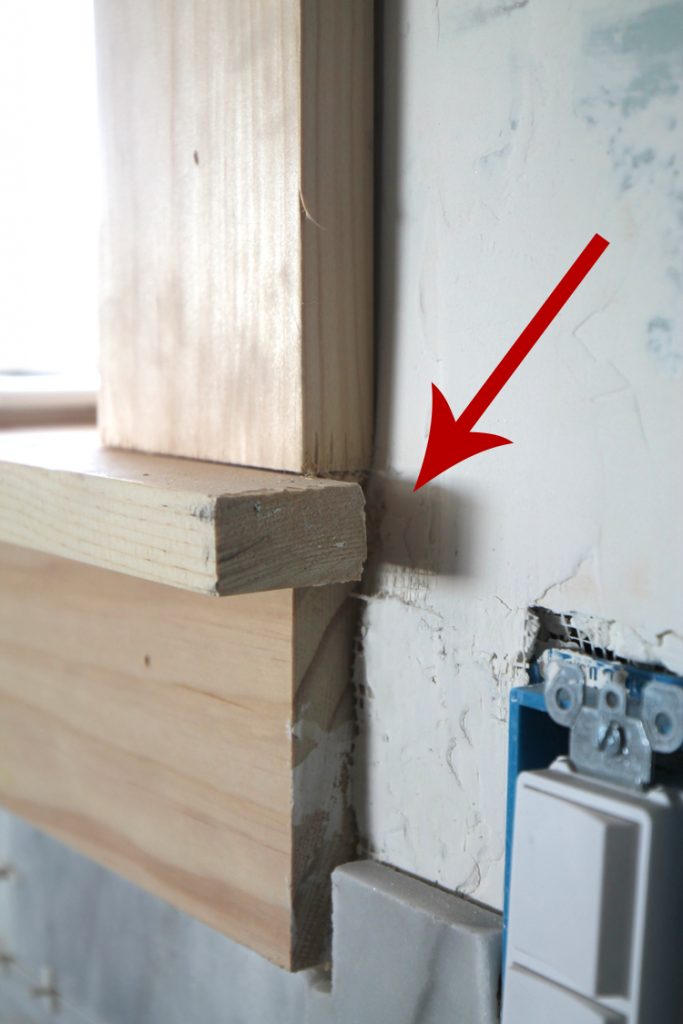
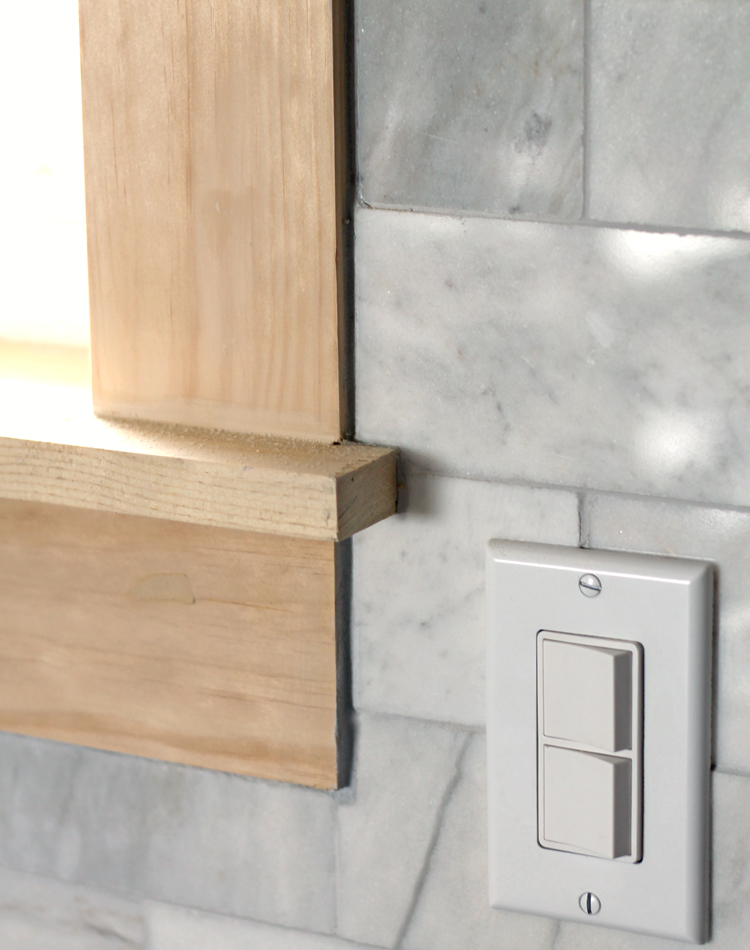
The next tricky part of the backsplash prep work was how to tile around our window trim. Since part of our window trim sticks out, we would have had to cut a very small piece out of our tile to make it fit. I didn’t imagine that going well, so we used our handy oscillating tool to cut into the back of the wood trim the same thickness as the tile.
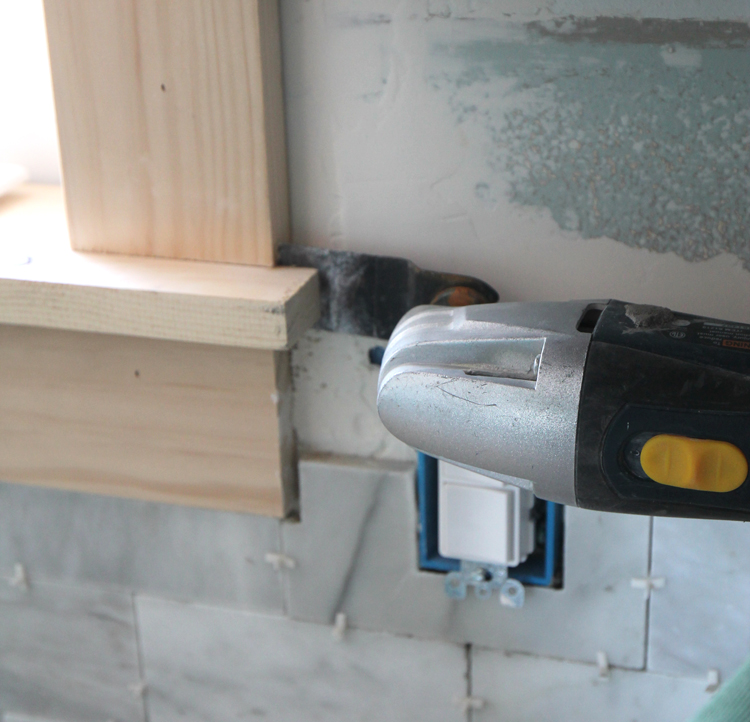
Then the tile just slid right behind the molding. This worked perfectly and I would definitely recommend this method for tiling around window trim.
Okay, now on to the actual tiling process.
Here are all of our best tips, tricks and mistakes to avoid when installing a backsplash, specifically a marble subway tile backsplash.
1. Marble darkens considerably when wet. I’ll admit, I completely freaked out. It was so gray and not the light, pretty backsplash I had envisioned. You can see in the photo below how the water was seeping into the tile and darkening it:
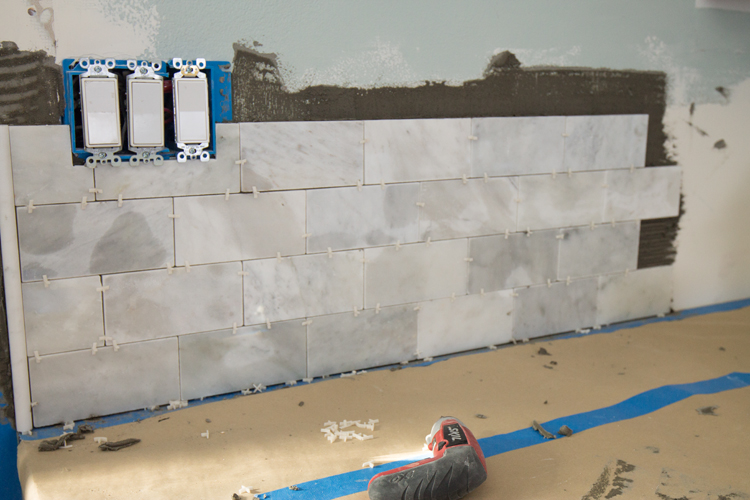
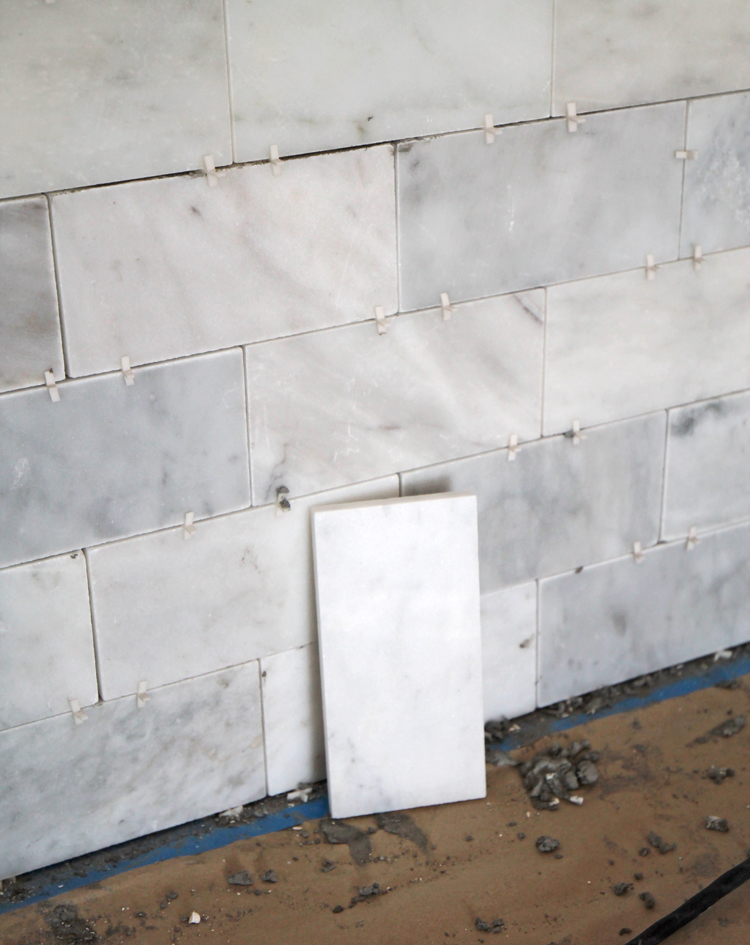
Here’s another photo that shows a dry tile leaning up against all the dark tile. See that huge color difference? Don’t freak out! It goes away once the tile dries, which took two days for us.
2. Mortar Color. Use mortar/thinset that’s similar in color to your tile. We used this dark gray mortar and although it was fine, it would have been easier if it had more closely matched our tile. The little bits that squirt out between the tile wipe off even after they’re dry, but just in case you miss any, it’s better if it matches more closely.
3. Starting Point. Start in the least conspicuous spot in the room. We did the opposite. We started right at our feature wall area and since this was our first time tiling, we definitely got better as we went along. I wish we would have started on the wall behind the oven and waited until we got the hang of tiling before doing the more visible area.
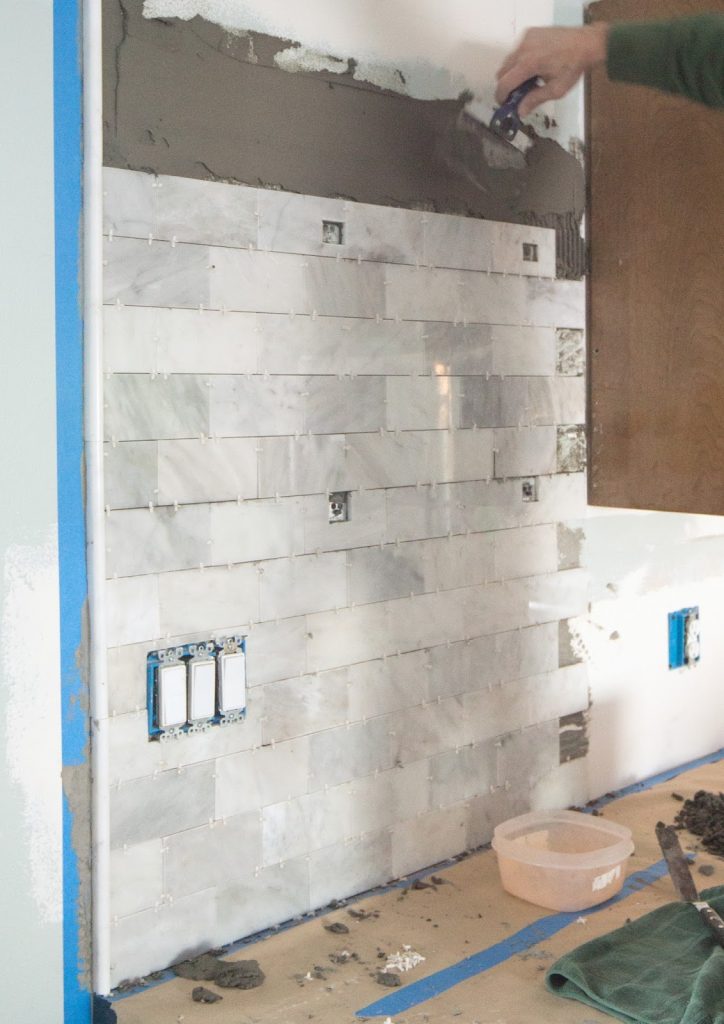
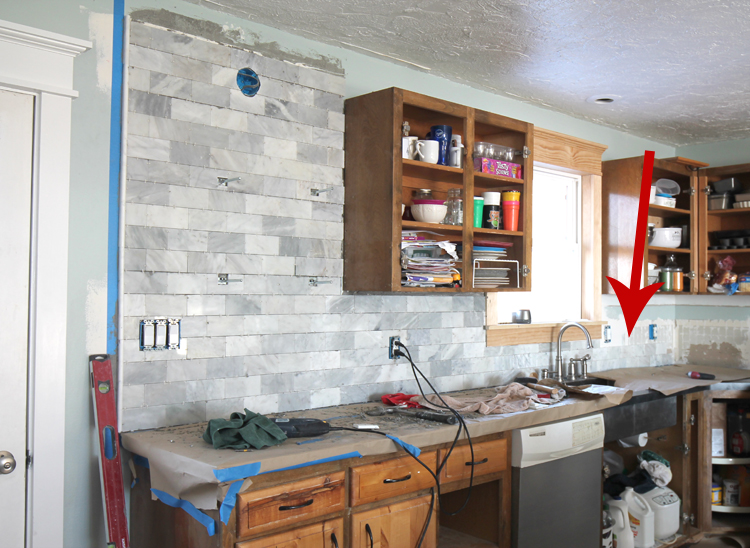
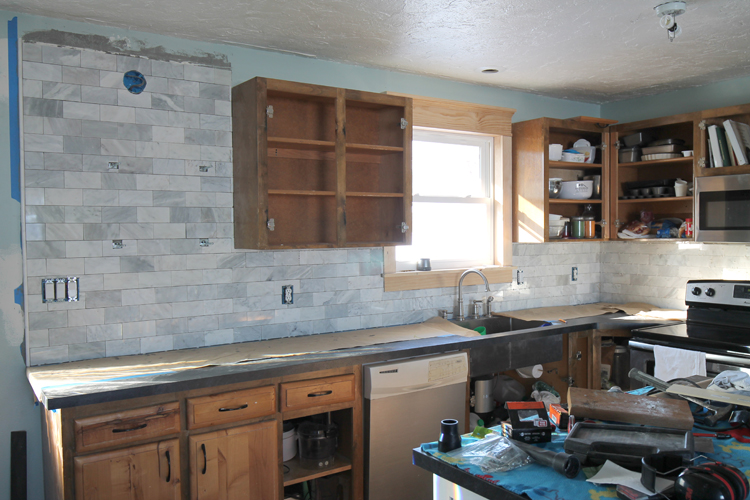
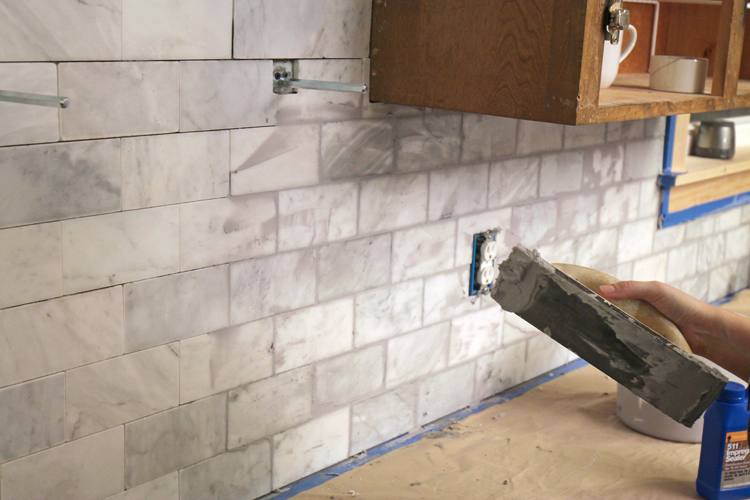
4. Time. This is a big job and it takes longer than I would have guessed. It took two adults working non-stop for about 25 hours to install the tile and grout it. And that doesn’t include the prep before hand. That’s just actual tiling time. This photo shows how far we got on the first day after 8 hours of labor:
If we were to do it again, I bet we could shave some time off since we know what we’re doing now.
5. Work in small sections. Don’t smear thinset all over the place and then try to race the clock. Just do a small section so you don’t feel that panicky time crunch feeling. I prefer to apply the thinset to each tile individually, like you’re buttering a piece of bread.
6. Product Choices. I was overwhelmed with the options in the tile aisle. There are so many choices to make and products to choose from! After tons of research, these are the products we used:
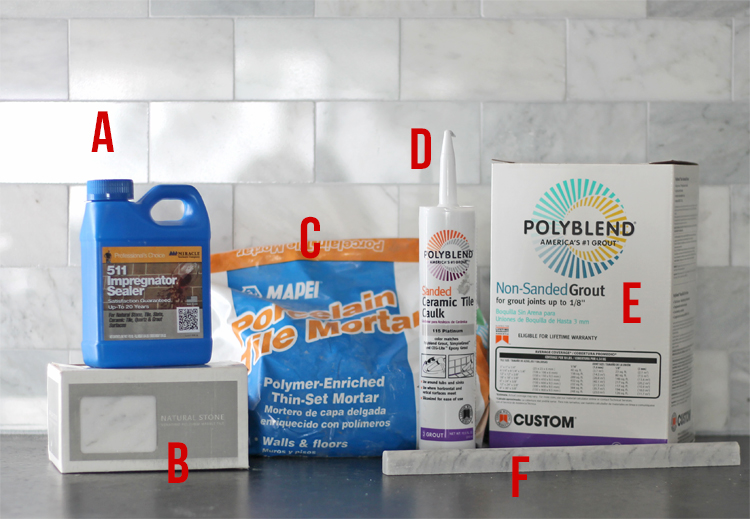
A. 511 Impregnator Sealer. This serves two purposes. We applied a coat to the tile before grouting to act as a grout release and prevent any discoloring from the grout. Then we applied another coat at the very end of the project to seal the tile and grout and protect from stains. There are a lot of different sealers out there, but after doing an insane amount of research, I chose this one to use with marble. So far it seems to be doing its job and I’m happy with my choice.
B. Marble Subway Tile. I looked online and at several local stores before settling on this tile from Lowes. It’s the standard 3×6 subway tile and was $5.98/sqft. which was the best price I could find. I am glad I bought it from a local store because it really helped my confidence to see it in person and I ended up with several extra boxes that I can now easily return.
C. Mapei Porcelain Tile Mortar Polymer Enriched Thin-Set Mortar. It worked great, I just wish I had bought a lighter color.
D. Polyblend Tile Caulk in Platinum. It matched the grout perfectly. I am so glad I found this product and didn’t use regular white caulk. We used it around the window, between the tile and the cabinets and along the seam between tile and countertop. To get perfect grout lines, use painters tape on either side of the space you want to fill with caulk. Squirt the caulk in, smooth it out with your finger, then peel the tape away while the caulk is still wet. You’ll get crisp lines every time!
E. Polyblend Non-Sanded Grout in Plantinum. We did 1/16th inch spaces between tiles (the smallest sized spacers they sell) so we chose non-sanded grout. We also wanted non-sanded grout because it doesn’t scratch the tile and since marble is so soft, it was definitley the right choice for us. If you are installing floor tile or if your grout lines are larger than 1/8th inch, you’ll need to use sanded grout.
F. Marble pencil tile. We also bought this at Lowes. It was kind of expensive… $6 per piece! But it finished off our edges so nicely that it was worth it to me to spend the extra money. Sometimes the wins are in the details. We used it here:
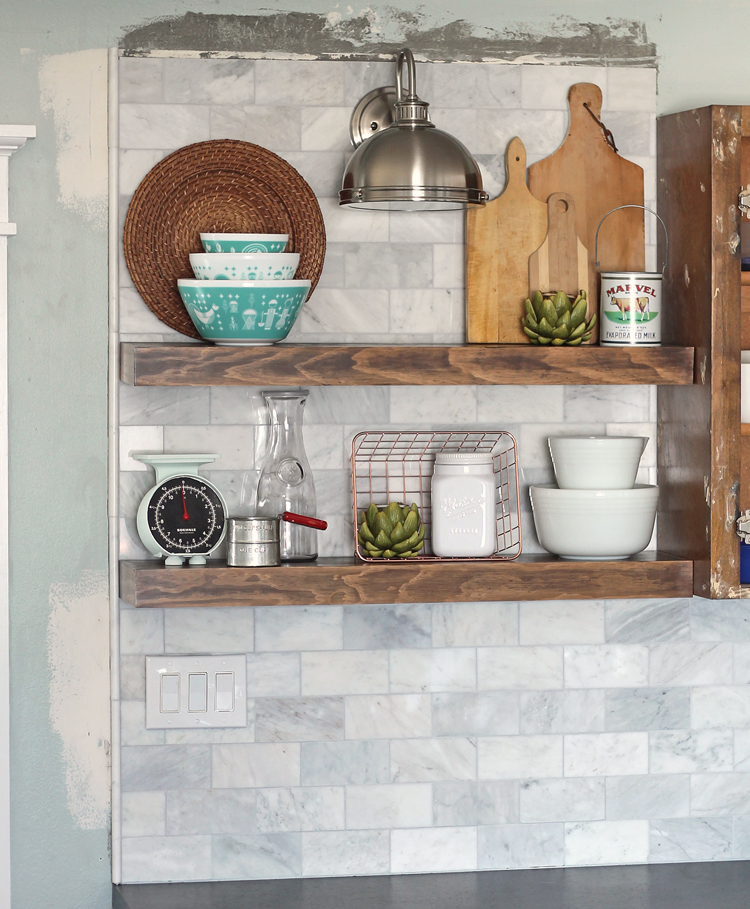
and here:
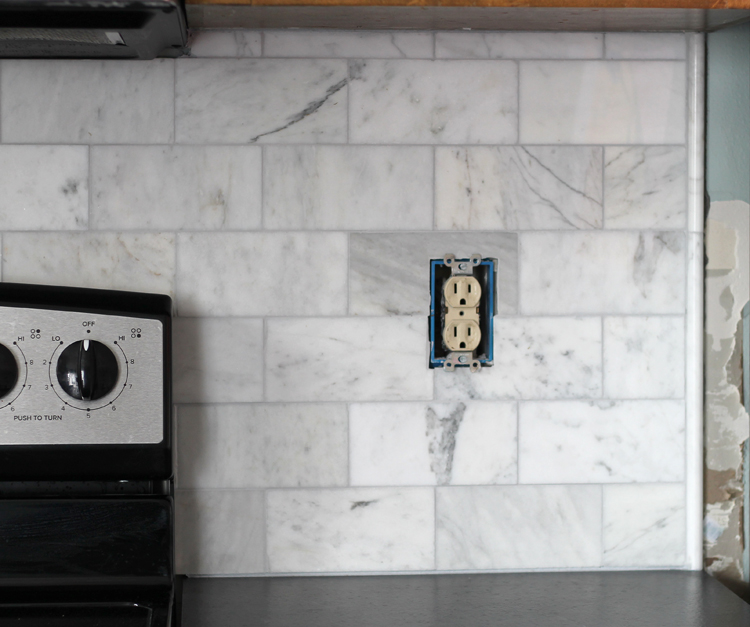
Those were our only two open edges.
7. Pencil Tile Installation. We found it was much easier to install the pencil tile first, let it dry, then install the subway tile next to it. You want the edge to be perfectly straight, so we made pencil marks on the wall with our level, then added painters tape, then used the tape as our guide. Don’t forget to add spacers between the bottom pencil tile and the countertop and between each pencil tile going up.
Obviously we’ve still got work to do painting cabinets and window trim and adding crown molding. That’s what the unfinished space above our tile feature wall is for. The molding is ordered and on its way so hopefully we can finish that up soon.
8. Grout. I’m really happy with the grout color. After looking at a lot of different photos online, I decided that a light gray grout looked best with marble tile. White was too harsh and anything darker made it look too busy and kind of dirty (just my personal opinion). I would definitely pick the same grout color again. I was amazed at how much better the tile looked once it was grouted. The grout went a long way to hide any imperfections or slightly chipped tile edges. The only tip I’d give with grout is to look over your work from every possible angle. It’s really easy to miss spots and you don’t want any “holes” in your grout job.
9. Tile Layout Planning. Plan out how you’re going to lay out your tile, where you’re going to start, and what the other end will look like when you get there. You don’t want a bunch of skinny weird pieces in the corner. We decided that our feature wall was the most important spot visually, so we started with full tiles there and lucky for us, the corner worked out well. One tip for tiling in a corner is to “wrap” the design around the corner. This is our corner:
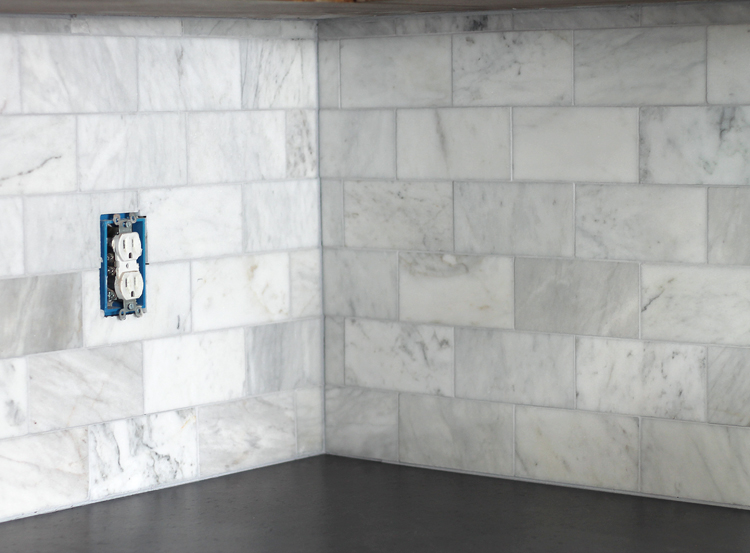
See how we used a short piece on the left side, then a longer piece next to it on the right side so that visually the design wraps around? That was a trick I picked up somewhere in Internetland and I think it made a huge difference.
The other choice we had to make was the spacing vertically. We chose to have a small piece tucked up under the cabinets. You can see it in the picture of the corner above. We thought it would be less noticeable than a small piece near the countertop. That worked well for us. You really can’t see that small row of tile under the cabinets unless you bend down and look.
Cost Breakdown
Tile (40 sqft) $240
Pencil Tile Trim (7 pieces) $42
Grout $14
Sealer $16
Thinset $14
Caulk $8
Spacers $6
Outlet Extenders $7
TOTAL: $347
We borrowed the tile saw, trowels, and sponges and other tile tools from a friend, so that saved us a ton of money!
Summary
The backsplash was a bit of a splurge. We could have used plain white subway tile and saved about a $100. But my heart was set on marble and it was WORTH. EVERY. PENNY. I am so thrilled with how it turned out. It takes our kitchen to the next level, for sure. And although there was a learning curve and it was a time-intensive project, we would definitely DIY it again some day. You totally can’t tell that two crazy kids just kept Googling things to figure out how to make it happen. 😉
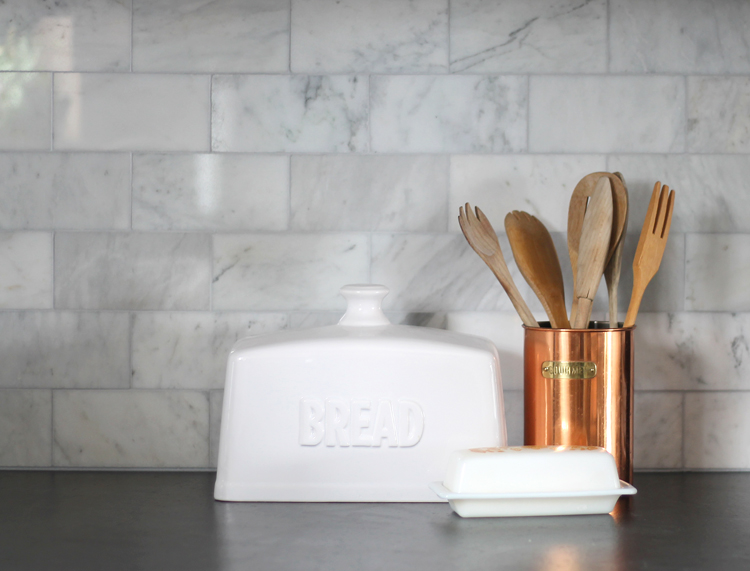
I wrote up a separate post detailing how we installed floating shelves over the tile backsplash, so if you’re planning to add floating shelves, definitely give it a read.
See the finished kitchen reveal here.
UPDATE: It’s been about two years since we installed this marble subway tile backsplash and I can honestly say it is my favorite thing in our entire house. Gorgeous, gorgeous, gorgeous! If you’re on the fence… DO IT!
Pin it so you can find it later.

Comments & Reviews
Looks really nice. Love the tiles.
Thank you Linda!
Wow! I've also picked the same tiles from Lowes to use as our backsplash. When I bought some boxes, I noticed that there was a big variation between the tiles – a lot of darker tiles mixed in with some whites. I saw that your backsplash is pretty evenly colored – did you have to pick out the tiles?
No, we didn't have to pick out the darker ones, but since it's natural stone, you might have just gotten some boxes with more dark ones in there. Maybe you could go back and look through the boxes on the shelf?
Hello.where are these tiles from?
Lowes
Thank you for such a thorough tutorial! We are getting ready to tackle this backsplash project and your post has been so helpful. Did you find the marble tiles were difficult to cut/many pieces broke? I’ve never cut marble (or any tile, for that matter) so I’m nervous about this part since I have read about marble being soft/breaking easily.
We had a few tiles break, but it really wasn’t too bad.
I see that you used spacers at the top and bottom of the pencil tiles between cabinets and counter tops, but what about the side of the pencil tile where the subway tile meets it? Did you use them there? Thanks!
Yes, we used the same sized spacers between the subway tile and the pencil tile.
Thank you! Just started today. So far, so good! 😊 really appreciate your help.
What you seen now your tile is called ghosting. If you use the wrong thinset with Marble tile, the colors will seep into the stone. Always use white thinset with Marble. Every time. Also, if the marble has a mesh backing, it’s highly recommended to use epoxy thinset. Your recommendation to use sanded grout with 1/8th inch grout is also not least correct. If someone has over a 1/16th, they should still use unsanded, or an excel grout, as the regular sanded grout will scratch the marble. Yours turned out great.
Hello Jennifer. I used your tutorial as my “bible” for my backsplash project. I used the same tiles as you, as I have beautiful, new Venatino countertops and the combination is gorgeous. I truly enjoyed the process and now it looks wonderful. However, I can’t find the Polyblend Unsanded Caulk in Platinum and I’m wondering where you purchased yours? I realize you completed your backsplash project sometime ago, but I’d appreciate any hints you can give me. Thanks so much for your inspiration and wonderful tutorial.
Hi Maria, thank you for taking the time to write this note. I love to hear that people are reading and using my tutorials! I was able to find a link on Home Depot’s website to the caulk. Hope that helps! https://www.homedepot.com/p/Custom-Building-Products-Polyblend-381-Bright-White-10-lb-Non-Sanded-Grout-PBG38110/100553533
This is a great article with awesome tips! I’ve done tile before, but it’s been a while and I’m so glad I read this. Thank you so much!
How did you make the cuts in the marble time for the anchors? Struggling to figure out the right tool/but/blade to use or find for this.
We cut all of the tile with a tile saw.
Good article, i read it as a refresher. Going to do the same tile in my bathroom over the counter. Question – how did you handle spacing around the corner? I am wrapping the cut tile on the inside corner but wanted to know about the spacing? Did you butt the tile from one wall up to the tile on the side wall or did you leave a space and then caulk/grout the space?
Nice looking project!
It’s been a while, but I believe we left a space and filled it with caulk after.
Did you paint the cabinets yourself, use oil or latex and spray or brush? We’ve just launched on an almost identical project and your post is going to be a great help. Thanks
I wrote a separate post all about how we painted our cabinets. https://www.thecraftpatchblog.com/the-best-paint-for-kitchen-cabinets/
Thank you for sharing this blog. It was so helpful in our marble tile backlash project which is looking amazing! We just have sealing and grout left.
-Bree & Rich (livingmyhomelife.com)
Thank you for all of the details! This has been an amazing reference for my attempted marble tiled wall. Question on the cuts around the light fixture. How did you get precise circular cuts with the wet saw? Did you have any issues doing so or do you have any additional tricks you could share on that part? I’ve watched so many videos on circular cuts but mostly all are on ceramic tiles in which they start with a wet saw and finish with nippers (which I don’t know if they work on marble). My light fixtures will but against the circular cut and I’m nervous the cuts will be jagged. Thanks SO MUCH in advance!
Hi Leyla, Whenever you have to tile around something like a light, you want to plan so that the tile goes UNDER and the light sits on top and hangs over enough to cover all the rough edges. I don’t know how you would be able to get clean enough cuts otherwise. Hope that helps!
What type of marble is this?! I’m not sure if the link brought me directly to what you had purchased.
I just checked the link and it goes to the correct product. https://www.lowes.com/pd/Anatolia-Tile-8-Pack-Venatino-Polished-3-in-x-6-in-Polished-Subway-Wall-Tile/3477505 It’s a polished marble from Lowes.
Can I ask what your countertop material is? I’m looking at honed black granite and would love some feedback on upkeep. Would you choose dark again?
Our counters are laminate. I love the dark and would choose them again! Here’s more info: https://www.thecraftpatchblog.com/how-to-diy-laminate-countertops/
I love the way this turned out! What size spacers did you use?
TY! I’m thinking of a DIY backsplash too. Your info, pics super helpful. You’ve done all the research and will use those products. Your kitchen is stunning!!
What are yr countertops?
I just installed milky white quartz w muted gray dabs that looks like water was thrown on them. I almost cried when they installed it. Now adding honed porcelain 4×8 tile backsplash.
Very excited to move forward! Tks for yr info!
“Thanks for sharing this post. I learned a lot from it and I appreciate the time and effort you put into it.
Did you put a strip of metal or other material at the end of the finished edge?
We used a marble pencil trim piece vertically to finish off all edges and it looks so beautiful. You can see it in several of the photos in this article and I listed it in written text as well. I personally don’t like the metal edges. They are too industrial and modern for my style.