Learn how to build strong and sturdy pantry shelving (or walk-in closet shelving or garage shelves) with this detailed tutorial.

We’ve lived in our home for four months now, and we’re finally nearing the end of The Pantry Project. I’m almost ready to show you the whole, glorious project! But today I’m sharing how we built the pantry shelving. If you are new here, you have got to see what this space used to look like!
One common question I keep getting is about the size of this space. Our pantry measures 3 feet by 4 feet.
To build DIY pantry shelves, you will need the following materials:
Materials Needed
- Shelving Material – all of these options would work. Choose your preference and price point.
- Furring Strips 1×2″
- Vertical Support Post 2×2″
- Measuring Tape
- Stud Finder
- Drill
- Screws
- Miter Saw or Circular Saw
- Paintable Caulk
- Wood Filler
- Primer
- Paint – (THIS is my favorite paint for wood, trim, cabinets, furniture)
- Painter’s Tape
I would not recommend wire shelving for a pantry (or honestly for any situation). We had wire shelving in every closet when we moved in and we’ve slowly been replacing it because it’s super annoying! Everything tips over on the shelves, it doesn’t look nice, and it’s not all that sturdy. I can’t wait until every closet in our house is free of wire shelfs. Blech! Wood pantry shelves are sooooo much better!
I really like 12 inch shelves for a pantry. The depth is adequate for pretty much everything I’ve needed to store in here, but you can still see all of your items. If the shelves were any deeper, things would just get lost in the back.
You definitely want to use screws and an electric drill for this project instead of nails and a hammer.
Shelf Spacing
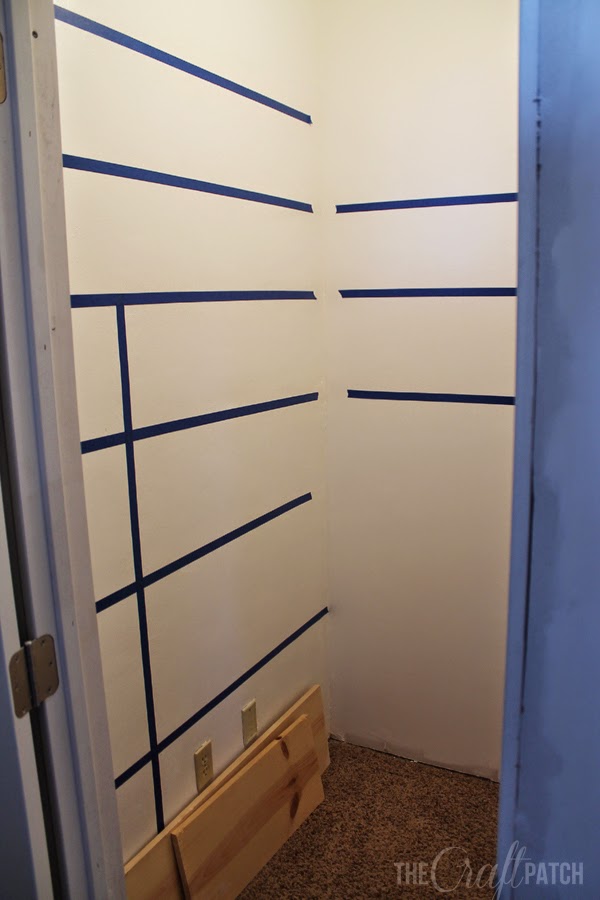
I spent a lot of time trying to decide on the spacing of the shelves. I knew the bottom space needed to be big enough to fit a five gallon food storage bucket. I also wanted a few large shelves for oversized items. But I also wanted to be able to fit as many shelves as possible into this little space. I measured the height of canned goods, mason jars, cake mixes, cereal boxes and soda bottles and different storage bins that I wanted to use, just to help me know what sizes would work. After I came up with an idea of what I wanted, I used blue painters tape to mock up the shelves:
It was so helpful to see what the shelves would look like!
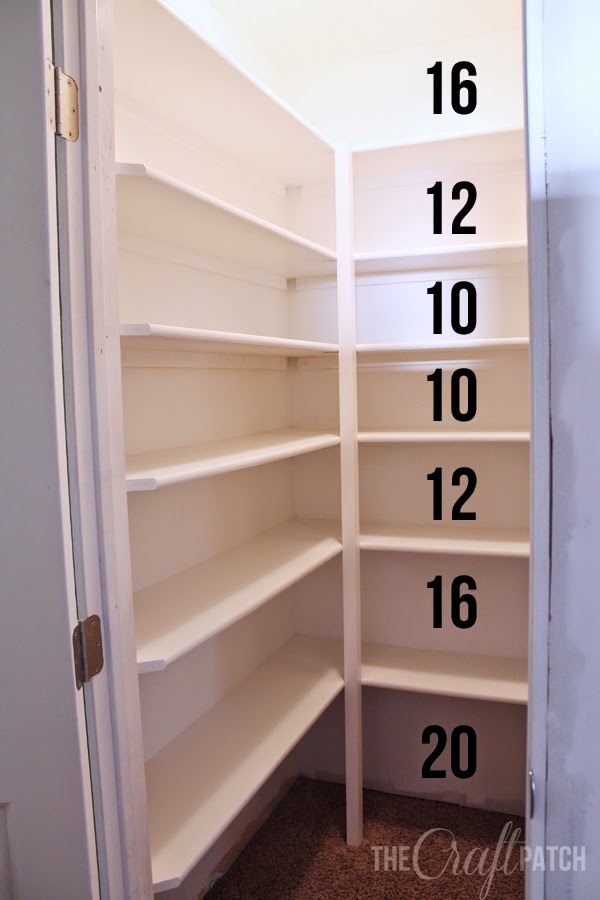
Here’s the shelf spacing we ended up going with:
Update 8 years later: This pantry has worked out really well and the spacing is excellent. I would space the shelves the exact same way if I were to do it again.
Building the Pantry Shelves
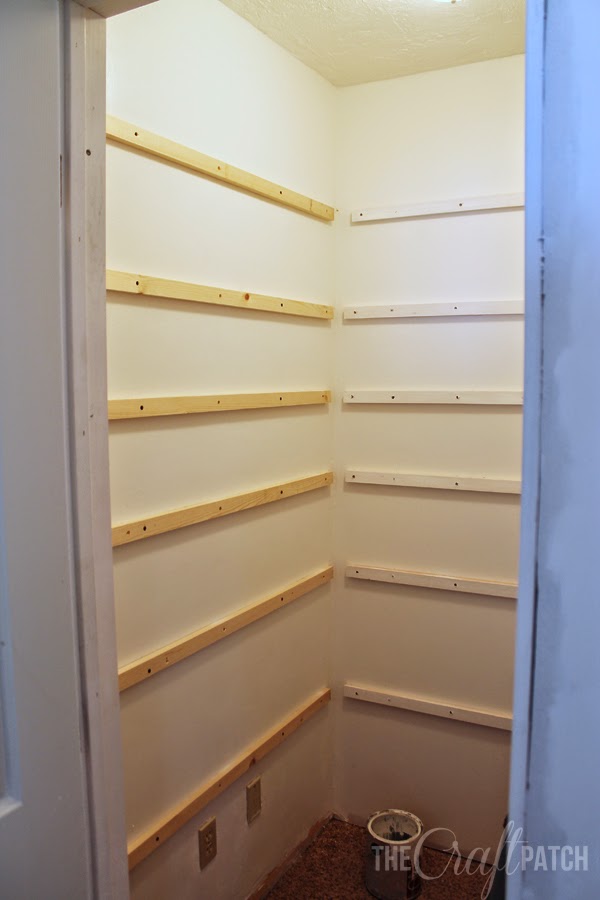
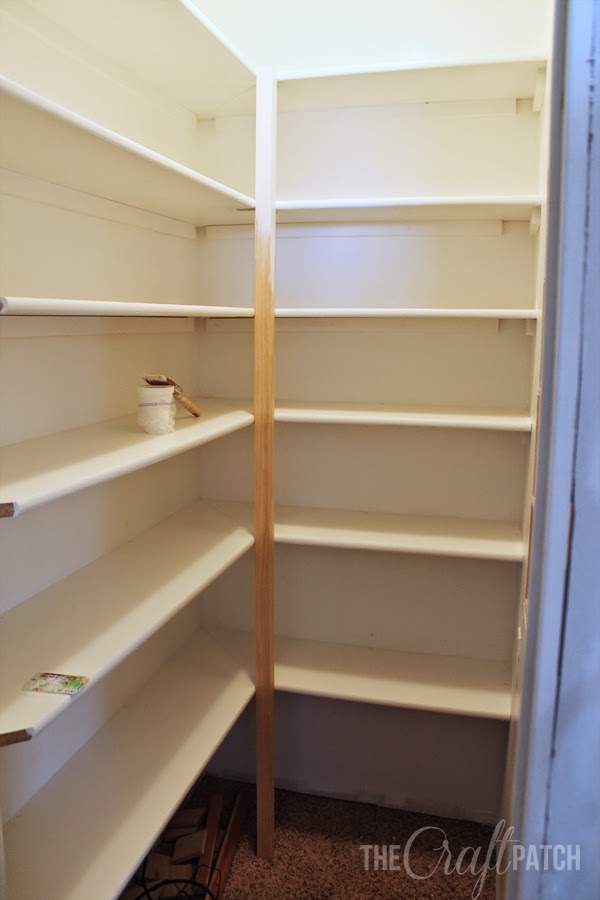
Next, it was time to start building. I turned this part over to the hubsters. He started by screwing 1×2 pieces of wood (called furring strips) to the walls. He used a stud finder and marked the drywall where the wall studs were, then made sure that each furring strip hit a stud in two places and was perfectly level. We didn’t need to use drywall anchors because we only screwed into studs.
In hindsight, I would have cut the furring strips to fit exactly on each wall instead of being a few inches shorter, purely for aesthetic reasons. I think it would look more seamless if the furring strips went all the way to the side walls and back wall. Oh, well. Live and learn, then blog about it so others don’t make the same mistakes. LOL.
I painted the wood on the walls at this point. I figured it would be a lot easier than trying to do it after the shelves were in.
Next, we cut shelving out of particleboard. We chose MDF boards for the price, but it is kind of a pain to cut. The edges crumble if you aren’t careful, so be patient. It can also help to line the places you plan to cut with painters tape.
I painted all of the shelves before installation and it made the process so much easier. Definitely recommend using a good quality primer too. If you use quality paint, there’s no need to apply a polyurethane or topcoat.
Corner pantry shelves are tricky. The shelves are mitered where they meet in the corner. Because we purchased board with one bullnose edge, if we had just cut them so they butted up against each other, there would have been a weird dip where the bullnose edge met up with the flat cut edge. We opted for the mitered corner instead so that the rounded bullnose only goes along the fronts of the shelves. It was worth it to us to construct the shelves this way because the bullnose edge makes it look finished without having to buy or install a front trim piece. We added wood glue to the mitered seam just to help the two shelves stay together.
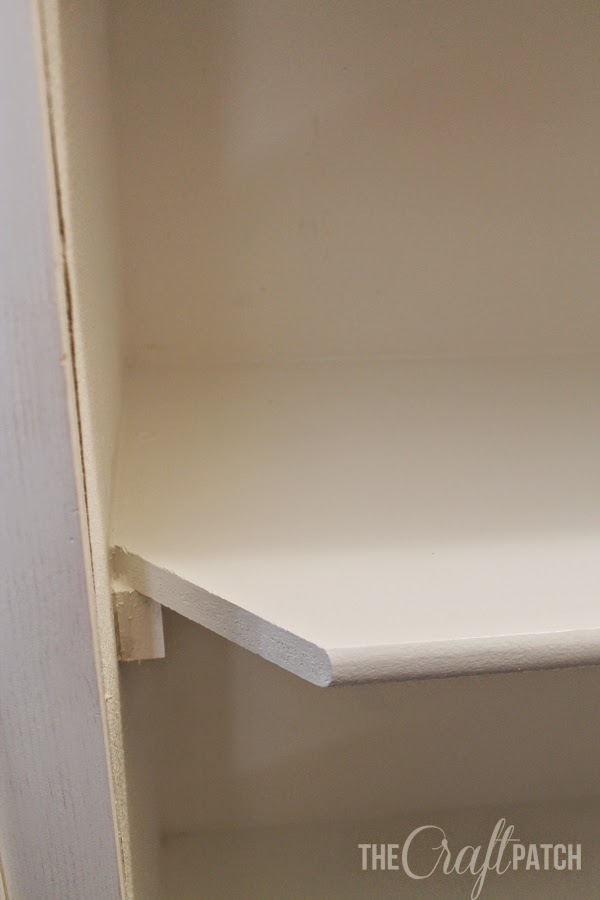
To reinforce the back corner where the two shelves meet, we used a 2×2 piece of wood as a vertical pole. The shelves are attached to the 2×2 with metal L-brackets, two on each level.
Here’s a close-up of the brackets looking up from inside the shelves. You need two on each level so that one is attached to each of the two boards that meet at the corner. Make sense?

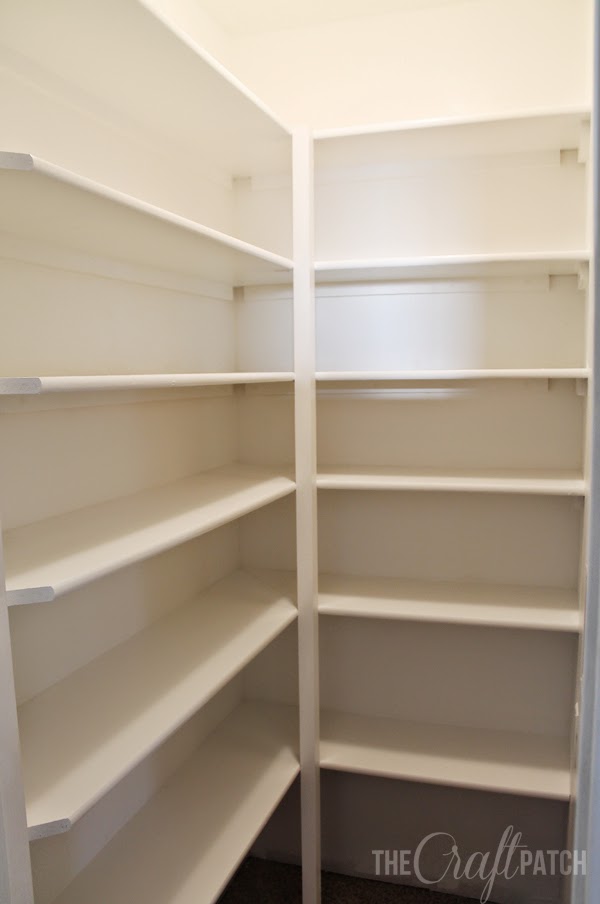
After everything was installed, I did a whole lot of caulking and filling in screw holes. It made all the difference! See for yourself:
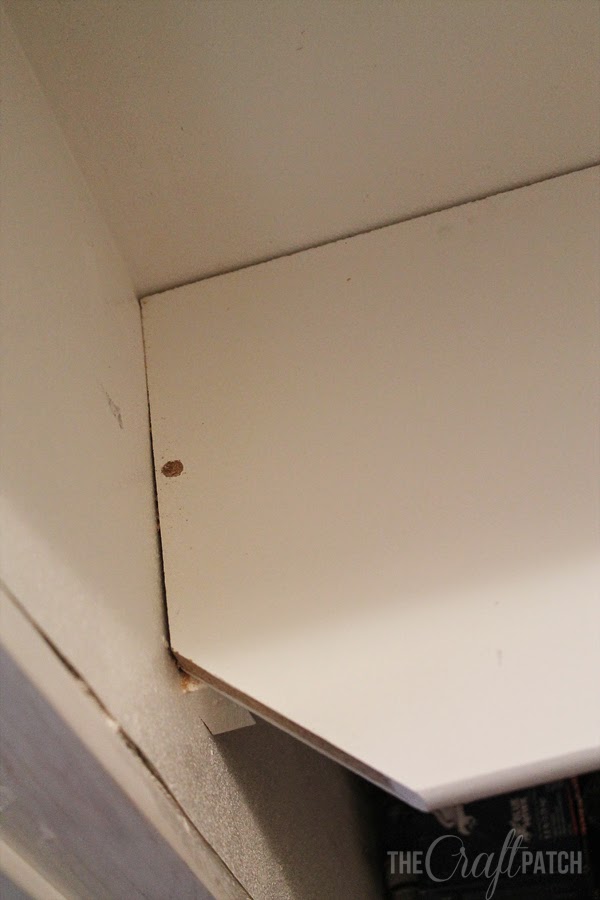
Side note: We cut an angled edge on one corner near the front door because they needed to go around the door trim instead of butting up against it. That’s why the photo above has the corner cut off at an angle.
The caulk took away all the screw holes, cracks and imperfections and we were left with clean, crisp shelving! I touched everything up with a bit of paint and then we just had to wait for the paint to cure before we could load this pantry closet up.
Isn’t it breathtaking? Okay, okay, that might be strong vocabulary for shelving, but this is my baby we’re talking about here! I’ve watched my crazy idea come to life before my eyes, and it’s given me the remodeling bug so hard!
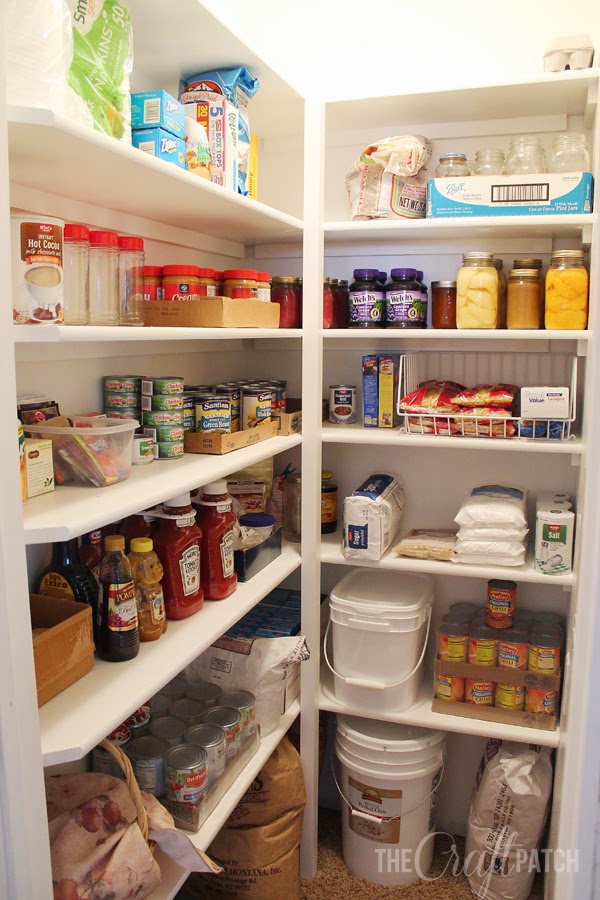
And here’s the pantry fully stocked:
There are still empty shelves in here and I cleaned out all the food from the kitchen cupboards and one shelf from the linen closet that’s next to the pantry in the hallway. Isn’t that amazing?! I can’t believe how much storage space we were able to get out of this little 3×4 space. Ahhh… I love my pantry! It is small but mighty.
To recap, here are the steps to build pantry shelves:
- Decide where you want each shelf to be and mark the spacing on the walls.
- Screw 1×2 pieces of wood to the walls where you want each shelf to be, making sure that each piece hits a stud in two places and is perfectly level.
- Cut shelving to length, mitering the side where it meets the other shelving.
- Use a vertical 2×2 piece of wood to reinforce the back corner where the two shelves meet.
- Attach the shelves to the 2×2 with metal L-brackets. You’ll need two for every level of shelving so that both sides of the shelves are bracketed to the vertical piece.
- Caulk all seams and fill all screw holes, then prime and paint.
We figured out a great solution for the third wall of the pantry that doesn’t have shelving on it… we built a shelf between studs! It holds quite a bit but doesn’t protrude into the room at all. It’s an amazing space-saving solution for this small pantry. Read about that HERE!
We are getting close on the outside too. Two out of three walls are textured and primed. We need to put up molding and baseboards, trim the door, texture the last wall, then paint everything. Can’t wait to show you!

Comments & Reviews
It looks amazing. You guys are so good at this stuff!
How many times have you hit your head on the top shelfs on the left?
Never! There’s no way you could because they don’t stick out. I’m not sure what you see in the photos, but the shelves are L-shaped against two walls with nothing sticking out that you could possibly bump your head on.
Beautiful! 🙂
Wow! Your pantry turned out so beautiful! I, too, and a pantry lover… Cannot have enough of them :-). Very happy for your new space.
Thanks, everyone!
I was wondering how big this space is?? looks about 3' x 4' or so. Would love to build something similar.
It is about 3×4! Good guess!
How deep are your shelves?
I'm wondering what would be a better alternate to using MDF, since it's a pain to cut?
You could use 1×12 wood boards.
How deep are your shelves?
11 3/4 inches… that's the size of the MDF shelves we bought.
Got to say this looks fantastic and I'll definitely be doing this in my closet 😀 Can I ask why did you decide to mitre the shelves together? I'm tempted to run the long shelf all the way to the end and leave it square, then just use one angle bracket to join the shorter shelf to the post.
We mitered the corner so that both sides of the shelf could be attached to the pole in the corner. We worried that supporting the weight of one shelf against another would make them sag over time.
Hi,
One thing you could change for future builds that will make your shelves easier to build, cheaper and stronger =]
I see that you cut your shelves so they have a 45 degree cut to then attach 2 post brackets to the riser post for
each level, so each shelf looks like is supported by 2 wall brackets and 1 post bracket per side.
Instead if you keep that shelf going to the back, it would be supported by 3 or 4 wall brackets depending
on which side you ran the full length, and only the other side needing 1 post bracket since it is supported
by 2 or 3 wall brackets. Since the shelf is supported by the wall brackets and not another shelf with a post
bracket it will hold more since it isn't relying on just the 2 screws in the post bracket to hold it in place.
In effect your balancing the idea of, will it sag vs. can 2 screws hold all the weight. Better make sure you're
using real steel screws and not any of the cheap aluminum ones!
When we did our walk through of our new home, they had done all the laundry and pantry shelves that way and we
asked how they hold up, the cabinet guy stood on the shelf saying, it holds a lot more than you'd think! Eeeep!
was sure our new pantry would get ruined before we moved in, but he said they have to test each shelf to hold
100 lbs..I was sold I sure as heck wouldn't ever stand on the thing! I guess though adding all the possible
weight of cans, sugar, flower, and all the things most pantries have it could easily hit 100 lbs on a wide
enough of a shelf.
I've had to build more shelves since moving in, and I've followed that technique and had good success with it.
Less post brackets, and stronger shelves is always a good thing! I love what you did, it looks really nice!
Awesome job on the finished pantry!
Kevyn
Thanks for the ideas, Kevyn! I'll keep them in mind next time we build shelves! 🙂
Hey Kevyn, someone else asked for a picture of what you were describing in position on boards. Are you able to do that? Maybe comments don't allow adding photos?
Jennifer – Love love the look of this and will be doing it soon in our pantry! Thanks so much for posting!
Hey Kevin,
We built another set of shelves in our laundry room using the same method as the pantry and doing so made me remember WHY we cut our shelves on an angle in the corner. Because the MDF boards we used have a rounded edge, you can't just butt two of hte boards together in the corner. The rounded edge prevents that from working. So our solution was to cut them at a 45 degree angle.
Funny how you can forget things like that, isn't it?
Any pictures of this?
Hey Kevyn, could you post a picture of what you are talking about? I think I understand what you are saying but I'd like to see a pic.
Would you mind sharing where you found the MDF shelving with the rounded bullnose edge? I came home yesterday and my husband and children had cleaned out and taken down all of our wire shelving. I'm now trying to plan our new shelves and my husband and I really like this look. We can't seem to find this type of shelving/boards in any of the home improvement stores.
Erica, We bought our boards at Home Depot. I included the link below. If you type in your store location on the website, it will actually tell you the exact aisle number where they are located. Good luck tracking them down!
http://www.homedepot.com/p/Bullnose-MDF-Board-Common-3-4-in-x-11-1-4-in-x-8-ft-Actual-0-75-in-x-11-25-in-x-97-in-1002404/202088764
Looks nice. Not to be nitpicky, but is there a reason you didn't run your 1×4's all the way to the corners? Those gaps are kinda bugging me. Not that anyone really sees them, especially when the shelves are full, but I think it would've looked a little cleaner to have no gaps for you shelf supports.
I agree and I'm totally with you! My husband had already cut all of the wood before I realized what he was doing. If I were going to do it again, I would definitely have run the 1×4's all the way to the edges!
Okay, thanks for the reply. Again, it looks great! We're going to build ours pretty soon. I think the height spacing you have between each shelf is perfect, so thanks for posting that — it'll make it a lot easier when we do our layout.
You're welcome! I have been really happy with the shelf spacing and I wouldn't change that part at all.
Good luck with your project!
Hi Jennifer….i'm about to plan my pantry and your tips and shelf spacing idea will come in handy. Thanks for sharing.
Christine, you're so welcome. I hope you LOVE your new pantry!!
Love your pantry, Jennifer! I just sent the shelf spacing numbers to my general contractor to use in mine. I'm not able to do the work but I make a great designer and supervisor ;-D Congratulations on the marvelous results on your project.
Hurray! Truthfully, I am the designer/supervisor around here when it comes to building. My husband does all of that. I just caulk and paint. Good luck with your pantry project, Jackie!
I love this and will have a carpenter here next week to build my pantry shelves. I am wondering how high your space is from floor to ceiling and how thick are your shelves? I like your measurements, but my space is 96" so I want to adapt for my area. Thanks for all the great tips and for sharing the details of your project!
Hi Deanna,
Your ceiling is the same height as mine so you won't have to adapt if you don't want to. The boards are 3/4 inch thick. Hope that helps!
Hi, I love, love your pantry!! Actually, I'm kinda jealous…. my question is, we have ceramic tiles in the kitchen, how do you attach the 2×4's to the floor? I would prefer to use dry wall so I can paint it, which I've done before. It's the framing I'm new too😞
Putting in this pantry was the best thing we've done. I LOVE it so much.
As far as framing walls, you have to attach them directly to the subfloor. In your case, you'd have to remove the tile in a strip big enough for a 2×4 to attach. You can't build a wall on top of existing flooring. Google "How to Frame A Wall" and it'll give you a pretty good idea of what I'm talking about.
Good luck! I hope you can figure out how to add a pantry!
Great, thanks for advice. I don't know why I didn't think of that! (Just google it). I will let you know how it goes.
You're welcome. Hope all goes well! 🙂
How has the paint on the shelves held up? I'm wondering if from moving things around if the paint has started to come off?
The paint has held up perfectly. There's no wear and tear so far and it's been almost two years. I did prime the shelves with quality primer, then I waited the full amount of dry time between each coat of paint. I think those are the two really important factors to having a durable, hard finish.
Looks Nice. I am planning to start work on my pantry (4 ft * 8 ft). I have few basic questions on that.
– How can i make 8ft side stay strong for Kitchen related items? Should I use Wall Brackets?
– For Metal L-brackets, does these work?
https://www.amazon.com/Silver-Corner-Brace-Joint-Bracket/dp/B00HG9T5IG/ref=pd_sim_60_1?_encoding=UTF8&pd_rd_i=B00HG9T5IG&pd_rd_r=BW1XS5PV2Z4AKSHC5G41&pd_rd_w=jsfRC&pd_rd_wg=010Hf&psc=1&refRID=BW1XS5PV2Z4AKSHC5G41
Thanks,
Sri
Those L-brackets look like they would work. I would add one or two poles like I have in the corner along that 8 foot length to give added support.
Hi Jennifer!
Pantry looks fantastic!
Quick question —
I have wood floors in my pantry now and I was wondering how you or your husband were able to secure the 2X2 into the ground? Is it free standing or do you just use the other L brackets support the bottom from the various other shelves?
Thanks again!
-Aaron
It is not secured at the bottom. The shelves hold it in place and the weight load just "sits" on the floor if that makes sense.
you said that you used 1×4 strips as the support on the walls, however to me they look like 1×2's. Can you please check and verify? 1×4 boards seem a little extreme and would be quite visible. Thanks.
Oh, dear. You are correct… 1×2 strips, not 1×4! Thanks for catching that mistake. I will go back in and edit.
I have been dreaming of redoing my pantry this way since I saw your a few years ago…thank you for the clear directions and inspiration…this year it is happening!
This makes me so happy! You are going to LOVE having a pantry!
Hello, what type and sheen of paint did you use for the shelf? I'm wondering about durability and sticking. Thanks!
I used a semi-gloss paint so it would be easy to scrub. If you're worried about paint sticking, that's caused when you re-paint the second coat before the first coat is fully dry. Wait the full time suggested on your paint can (or even a bit longer if it's cold or damp weather) and you shouldn't have any sticky paint. Hope that helps!
What size was the space after you framed it? I have a very similarly sized "closet" that the former owners were using as a stacking laundry closet that I want to turn in to a pantry. Trying to visualize and love your shelves but I think our space may be less wide and deeper. I have 8ft ceilings, 35 inch depth but only 24" width.
Our space is about 3 feet by 4 feet. 24" would be too small to fit shelving and be able to walk next to it. I would just make it a closet with shelves that go all the way across, not in a "walk-in" L-shape, if that makes sense.
looks really nice. Good job.
Thanks for the post. I’m trying to understand the methodology but struggling to understand the section referencing the Lbrackets and the corresponding picture. Can you clarify? I cant seem to put the pic of the bracket into perspective… thanks for the help.
The photo of the l-bracket is looking up from below. There is one L-bracket on each side of the corner pillar since the two boards join there (one bracket on each board). The L-brackets just give the shelves a way to connect to the corner pillar to keep it from sagging. Does that help?
I love what you did. Can you tell me the dimensions of the pantry? We are wanting to build something like this into a tiny space and I’m wondering how it would work. Thanks for the great ideas!
Our pantry measures 3 feet x 4 feet.
I copied your pantry design for the 3’x4’ storage closet in our townhouse. I used 16” shelving for the back wall and 8” shelving for the side wall so the shelving butts together instead of mitered corners. The 3” L brackets on the posts support the narrow shelves very well. I have much more shelf space now and plan to alter the design for my 3’x2’ pantry next. Thank you for the great plan!
You’re welcome, Lorrie! I’m so glad you found my tutorial helpful. Congrats on all of your new storage space!
Looks great! What other types of wood could I use instead of MDF for the shelving? The area is a little over 3 by 5 feet. Also what is the best way to measure for accuracy? Thank you.
You can use any type of wood for this project… pine, oak, poplar. To measure accurately, use a good tape measure and take measurements at the back of where the board will be attached and then a second measurement near the front of where the board will sit… in case your walls aren’t straight.
Getting ready to design shelving for new construction so this was really helpful. Two questions:
1. How tall are the ceilings in your pantry? (I have 10’ ceilings in mine.)
2. Did you vary the depth of your shelves or are they all 11 3/4”? I think that’s what you posted.
Thx so much!
We have standard 8 foot ceilings and yes, all of our shelves are the same 11 3/4″ depth.
I love this! Do you have a ballpark of what this project cost?
It really would depend on the exact size of your pantry, but the biggest bulk of your expense would be wood for the shelving. One 8 foot board costs $11.76, so you could figure out a pretty good estimate from there. Then factor in a bit of extra cash for furring strip wood, the corner pillar wood piece, caulk, screws, paint, etc.
I used your shelves as a strategy for my 4.5×2’ kitchen pantry closet. Modified it a little by using primed pine with smaller 8” side shelves inside the double door. Also left room at the bottom for a 26” high storage cabinet With drawers for extra use of the floor space. It turned out beautiful and functional. Went from 3 low-budget wire shelves that the builder installed 5 years ago to 6 custom wrap-around shelves – almost doubling the surface square footage from 16 to 31. Sincerely, thanks for this post. It was perfect for my needs.
Todd, thank you so much for this comment! You made my day! I’m so glad you found this post helpful.
I just followed this tutorial and finally completed my pantry as well! I love it! I painted the walls Tiffany blue and did white shelves. I also did an entire shelf with dowel rods from top to bottom to store Pampered Chef stones and baking pans vertically. It turned out great! Thank you!
Hi Todd,
Would love to see. Please post a pic.
Thank you for the great idea! I followed your layout, with exception to the mitered corners. It turned really nice. We utilized both sides with shelves. This layout is 100 times better than our old pantry, as it utilizes much more of the space.
Ok! I’m changing my hall closet into a pantry! I am so excited, we have a galley kitchen with very minimal space, we’ve been using our garage for food storage and honestly, I’m tired of going into the garage for food. There are 7 people in our house, so storage has always been a problem!
I have one question though, I’m new to this so it may be an obvious one. So when you showed your space between shelving, is that where you placed your 1×2? so first one is 16″ from the ceiling and then the next one is 12″ from that?
No, the measurements include the actual space between, so you’ll have to add in the thickness of your material between each of those measurements.
Hi Jennifer,
I am re-doing my kitchen pantry and will be using your tutorial. I did have a quick question though, what kind of caulking did you use for this project? I researched a little bit, but was not sure what to use. Thanks for posting this tutorial, can’t wait to transform my pantry!!!
Use any paintable caulk. I like DAP brand from Home Depot. I get the all-purpose kind that says it’s paintable in 30 minutes.
The pole that you are using for the support in the corner, does it go clear to the top of the space or does it stop at the highest shelf? The pictures have a bit of a glare, making it a bit hard to tell. Thanks!
The pole does not go all the way to the ceiling. It ends flush with the top shelf.
Thanks so much for sharing your experience and knowledge. Also, I like that your pantry actually looks like a real pantry—not a photo shoot. Great job!
Love this transformation! Question: we’re in the process of building and our pantry is the same width, 3’4″. I wanted to do 12″ shelves, but nervous that wont give me enough room to walk in. Do you have any issues walking in yours? Thanks so much.
It’s tight, but we can go in and shut the door. It doesn’t bug me and I’m glad we did the 12 inch shelves.
Hi! I’m planning to do this project. I feel foolish, but how did you attach the shelves to the 1×2 supports? Just nail them on? Thanks!
No silly questions here! I attached the boards to the 1×2 supports by screwing into them from up above. Just make sure you use screws that will be long enough to go through the shelf and into the support strip without being so long that they poke through both. Hope that helps!
Hi Jennifer, love your project! What size screws did you use to attach your shelves to your 1×2 boards? I’m working on a project laid up by yours and I’m worried of splitting the wood since it’s so close to the edge.
We used regular wood screws, but I don’t remember what size. If you are worried about the wood splitting, you could always drill a pilot hole.
Hi Jennifer
I am planning of building my pantry under the stairs and i was having a hard time figuring out what sizes and gaps and all. This is really a great help since im doing it all by myself. DIY as it is. The spacing and the height are really perfect match for mine. Thank u so much. Hey not to mention my name is Jennifer as well. Lolz
GodBless
DIY Vlogger from Philippines
Thanks so much for sharing your experience and knowledge. Also, I like that your pantry actually looks like a real pantry.
Great job!
I love how like six years later this post is still getting traffic and comments and it’s clearly a much needed and well viewed project.
We are doing our pantry in about one month and although not exactly as laid out in this post I can say without doubt this was the inpiration of what we want to do.
Thanks so much for posting and sharing such great info.
Thank you so much for this! I just redid our pantry, modifying it for our purposes. So helpful!
I’m getting ready to build my pants and I’m going by your design hope it turns out good. My pantry is 4 * 5 1/2 ft
Love it. Wondering the depth of your shelves?
We made our shelves the width of the boards we used. They measure 11 1/4 inches.
Nice work! A walk-in pantry is my sanctuary – the quietest room in the house. My tip: near my potato bin is a small cooler labelled “brussels sprouts”. It’s where I keep my chocolate. They haven’t gotten wise to me in 25 years!
I love this idea!
can I do 16 inch deep shelves? where would I get the one side of the shelves with bullnose? Can you buy them like that or do I need to attach the bulllnose?
You can do any depth of shelf you want, but sourcing the materials gets more difficult. We built ours with in-stock lumber from Home Depot because it is readily available and so much more cost effective that way.
How do you store items in the corner? I have a pantry like this and the corners are a problem. The vertical piece of wood is in the way. I loose a lot a storage in the corners.
I put lazy susans in the corners and store all my bottles and jars of extra stuff like ketchup and jam and soy sauce.
They turned out great! How long did this project take to build those shelves from start to finish? (only those shelves in this blog article, and not the in between stud shelves)?
It took us a few nights after work and a day of sanding, caulking, priming and painting.
Question! I have the same size space but I’m curious what size door you have for your pantry? Is it a normal door or a pantry size door?
The pantry door is 24 inches wide. We ordered it from Home Depot to match the other doors in our home.
Very nice pantry, however I think it’s important to point out that the shelf material you used appears to be particleboard, not MDF, based on the link to HomeDepot. Very different material and cutting/handling as MDF is significantly heavier and more dense, as well as more expensive and harder on saw blades.
I know this is an old post so not sure if you will see this comment, but this is what I decided the best layout for my pantry will be. The only thing I’m struggling with is the inner door casing and figuring out how to attach the angled part of the shelves. Mine is not flat and the width is small. Like 2.5 – 3 inches small. Is there a way I can avoid attaching them there? Like start the strips slightly past the door frame? My pantry is considerably smaller and the dimensions are making it really difficult. I’m also new to all of this. Thanks!
This is awesome!!!!!!
Getting loads of inspo here.
What is the function of that long ceiling to floor beam of wood where the corners meet?